Creating A Restaurant SOP to Manage Multiple Outlets
This article explains how you can use PeakScale to create and manage checklists for employees across multiple outlets.


This article explains how you can use PeakScale to create and manage checklists for employees across multiple outlets. PeakScale also offers modules to help manage outlet licenses, it has a helpdesk module for internal questions, task management capabilities, and a team training module, but these aspects of the product will not be discussed in this post.
If you’re responsible for a growing business with several outlets, PeakScale is a powerful operations management tool to help you manage your operations across multiple outlets. This article will walk you through how you can use PeakScale to set up, share, and maintain a practical set of SOPs for all your franchise venues.
Suppose your management operations have been running on a collection of Google sheets and WhatsApp groups till now. In that case, the steps outlined below will show you how to streamline your processes and keep all your restaurants running like a well-oiled machine.
Turning those scrappy Google sheets into your first multi-venue SOP
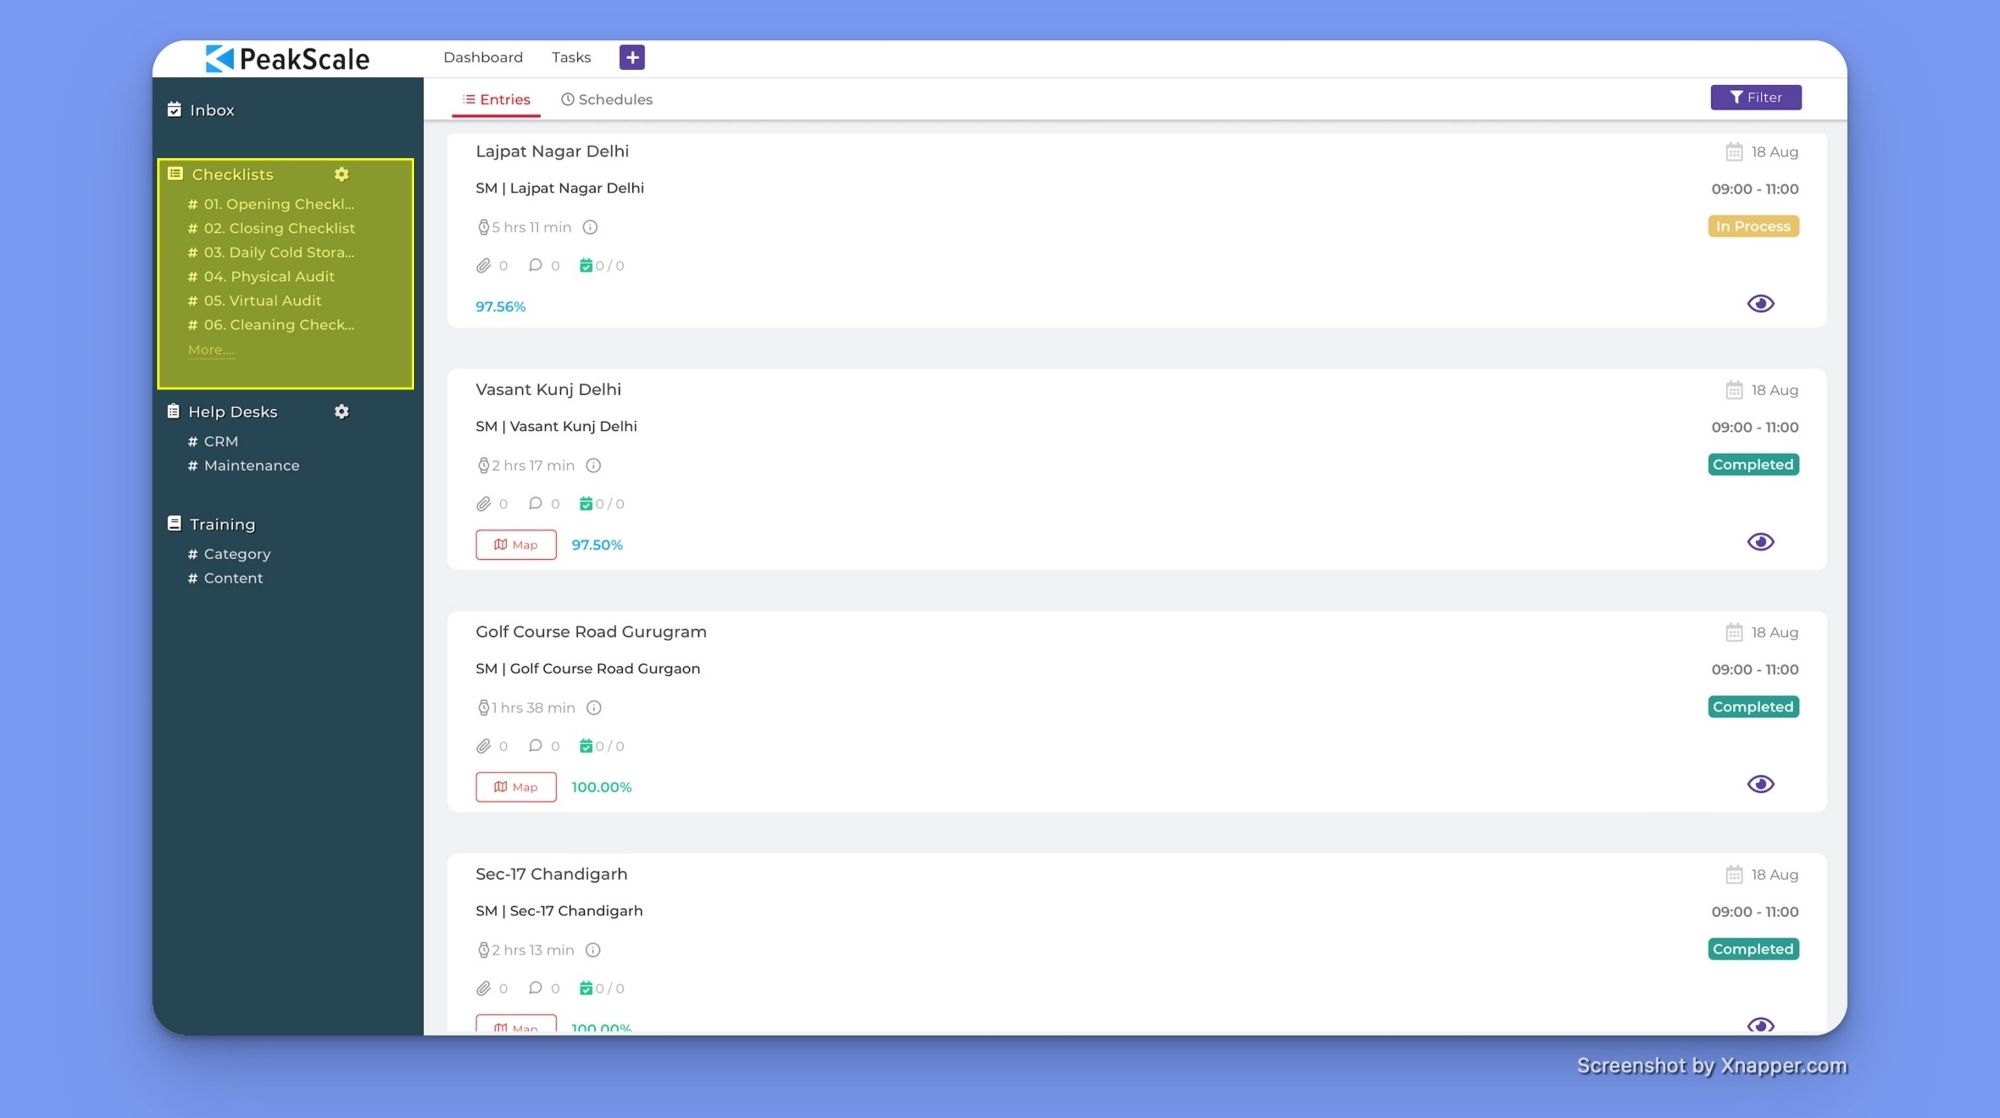
When you first sign in to PeakScale, you will see your inbox with all the tasks, responsibilities, and questions grouped by the SOPs assigned to you.
There will be a section for all your checklists on the left-hand sidebar.

If you don’t already have a PeakScale account, you can sign up for a free two-week trial by scheduling a no-obligation online demo with one of our representatives here. We will help you set everything up with your business's actual SOPs during the call, as well as answer any questions you have about the tool and what it can do for your business.
1. Creating your categories before you start
Before you can create your first checklist, you will need to populate the system with categories for the different types of checklists you will create.
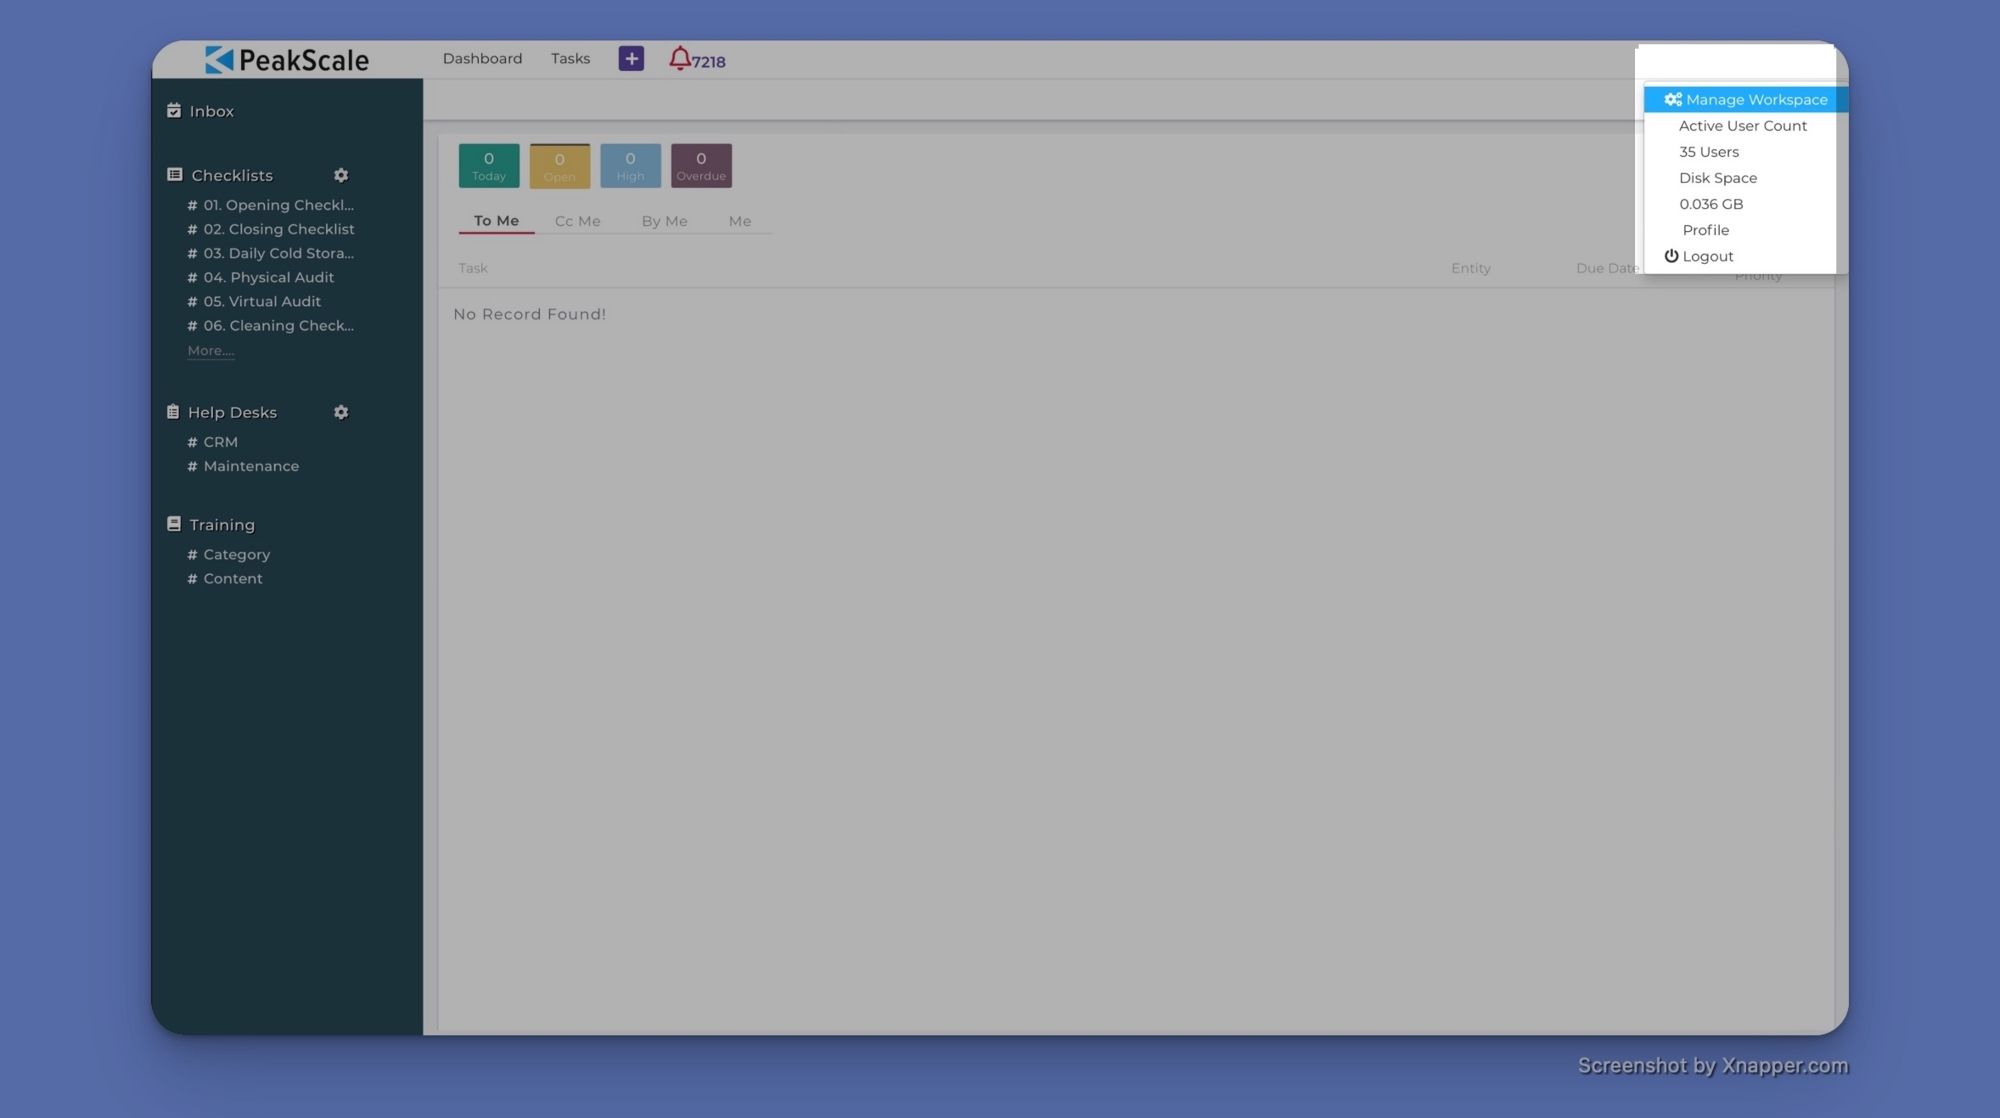
To create a category, go to the ‘Manage Workspace’ setting in the main dropdown in the top right-hand corner of the app.

This will take you to a setting page with a ‘Categories’ option in the side panel on the left. Selecting this will give you the option to create a new category.
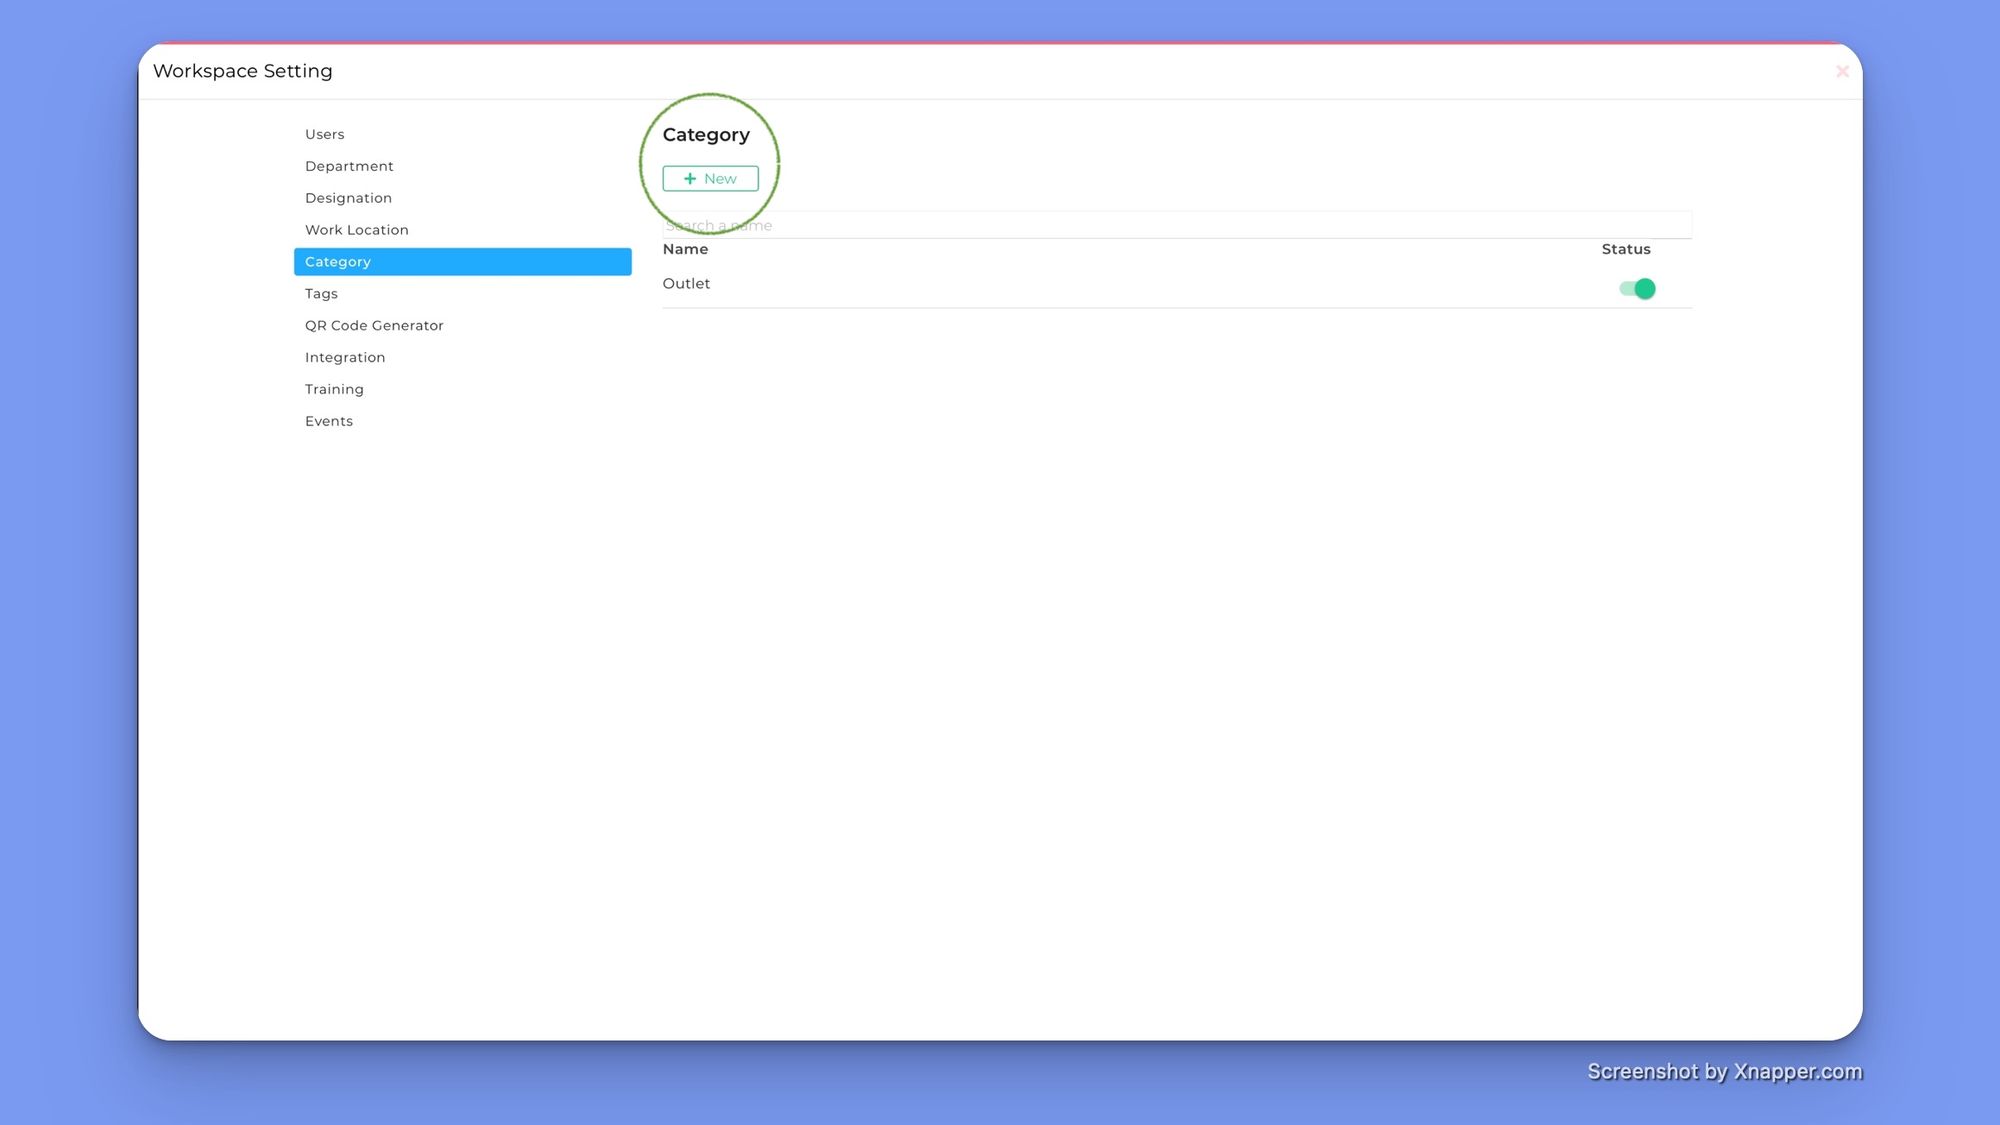
For the sake of this tutorial, you can just create an ‘Outlet’ category with a category type of ‘Location’. The location category type allows you to add geofencing to your SOPs. This ensures that people can only complete the procedures within an adjustable radius of the outlet.
The other category type is ‘Assets’. This would be more useful if you wanted to create SOPs for maintaining individual pieces of equipment. The ‘Assets’ category allows you to link to a location category. This would be useful if you wanted to create a procedure for maintaining a specific piece of equipment in a specific venue.
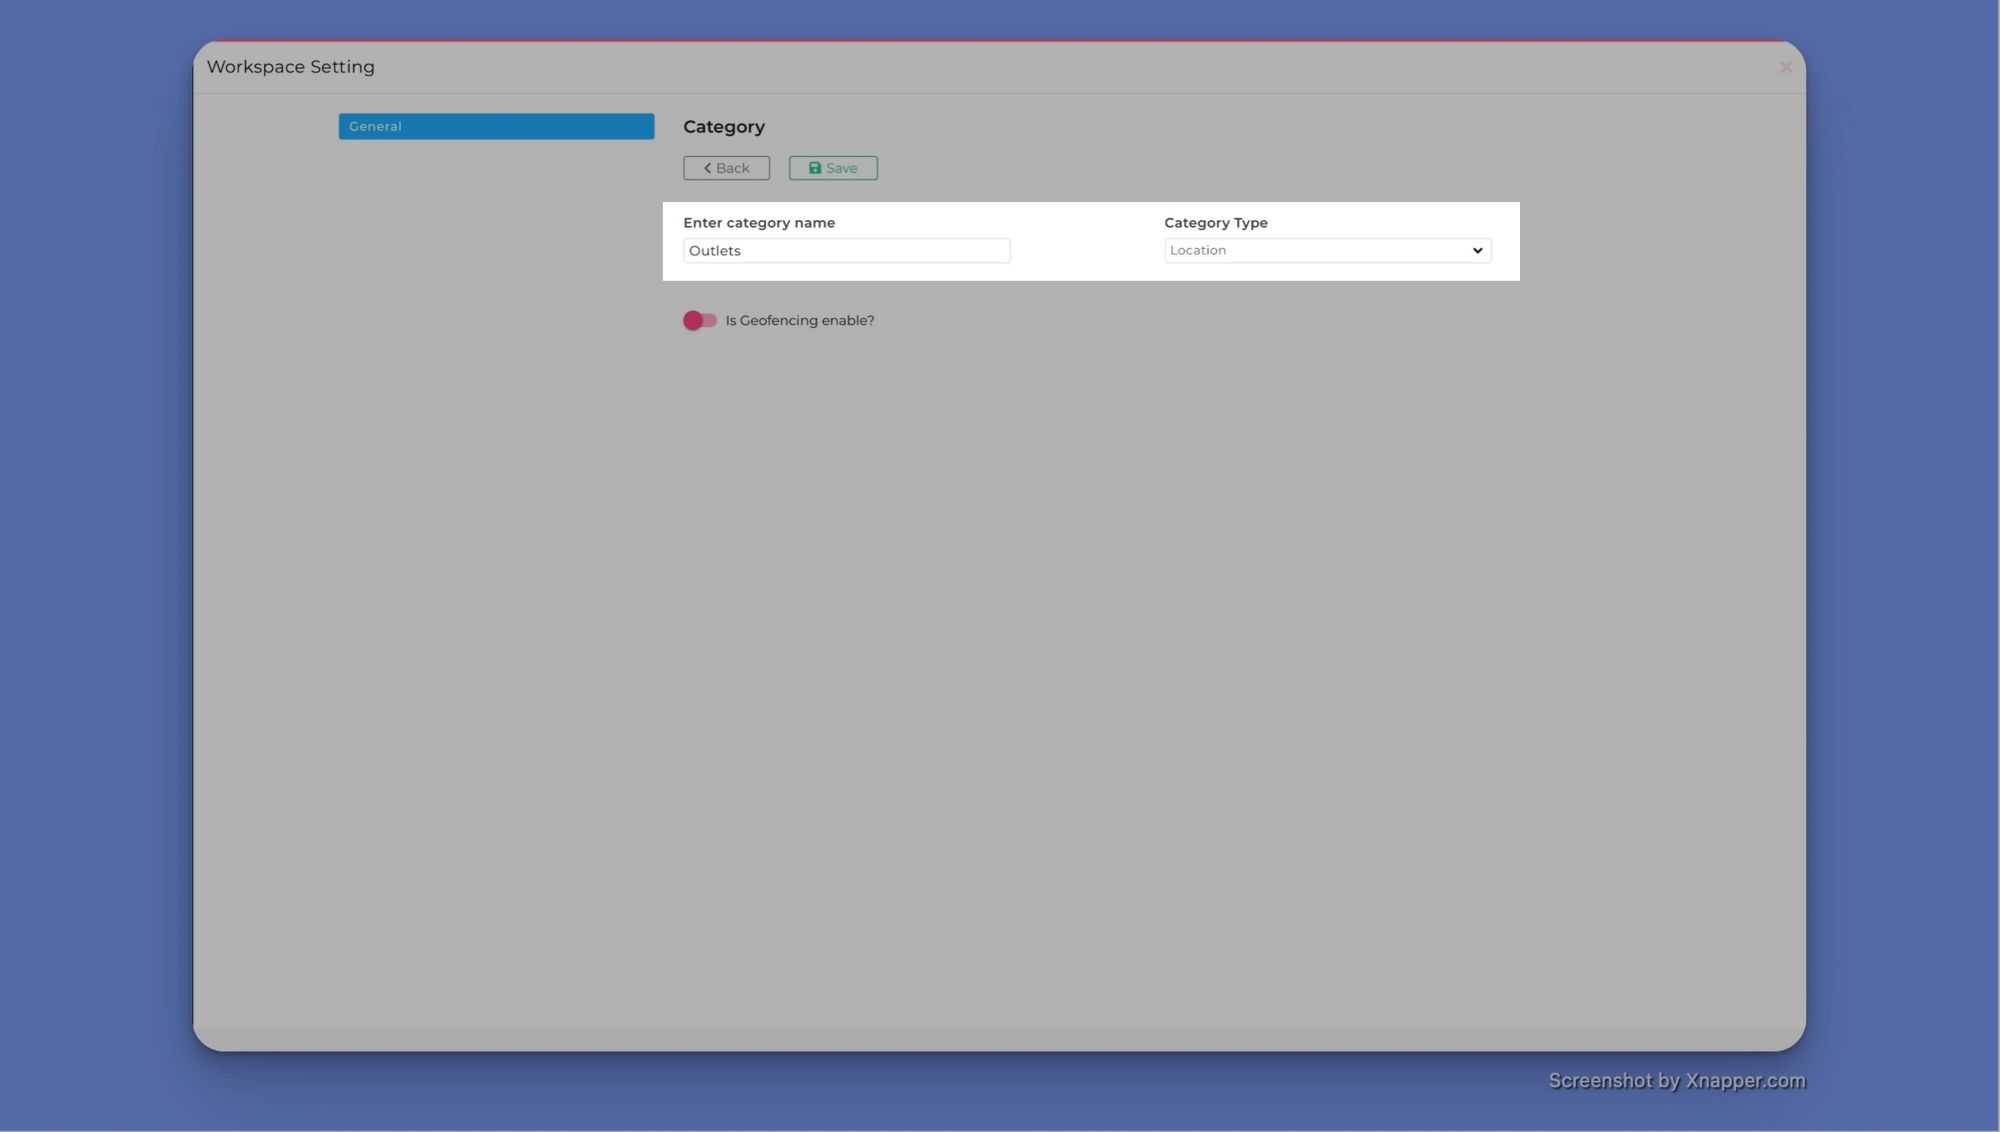
If the SOP you want to create is neither a location nor an asset, you can just select the ‘Other’ category. For example, if you wanted to create SOPs for how to set an outlet up for a birthday party or welcome instructions for high-profile clients.
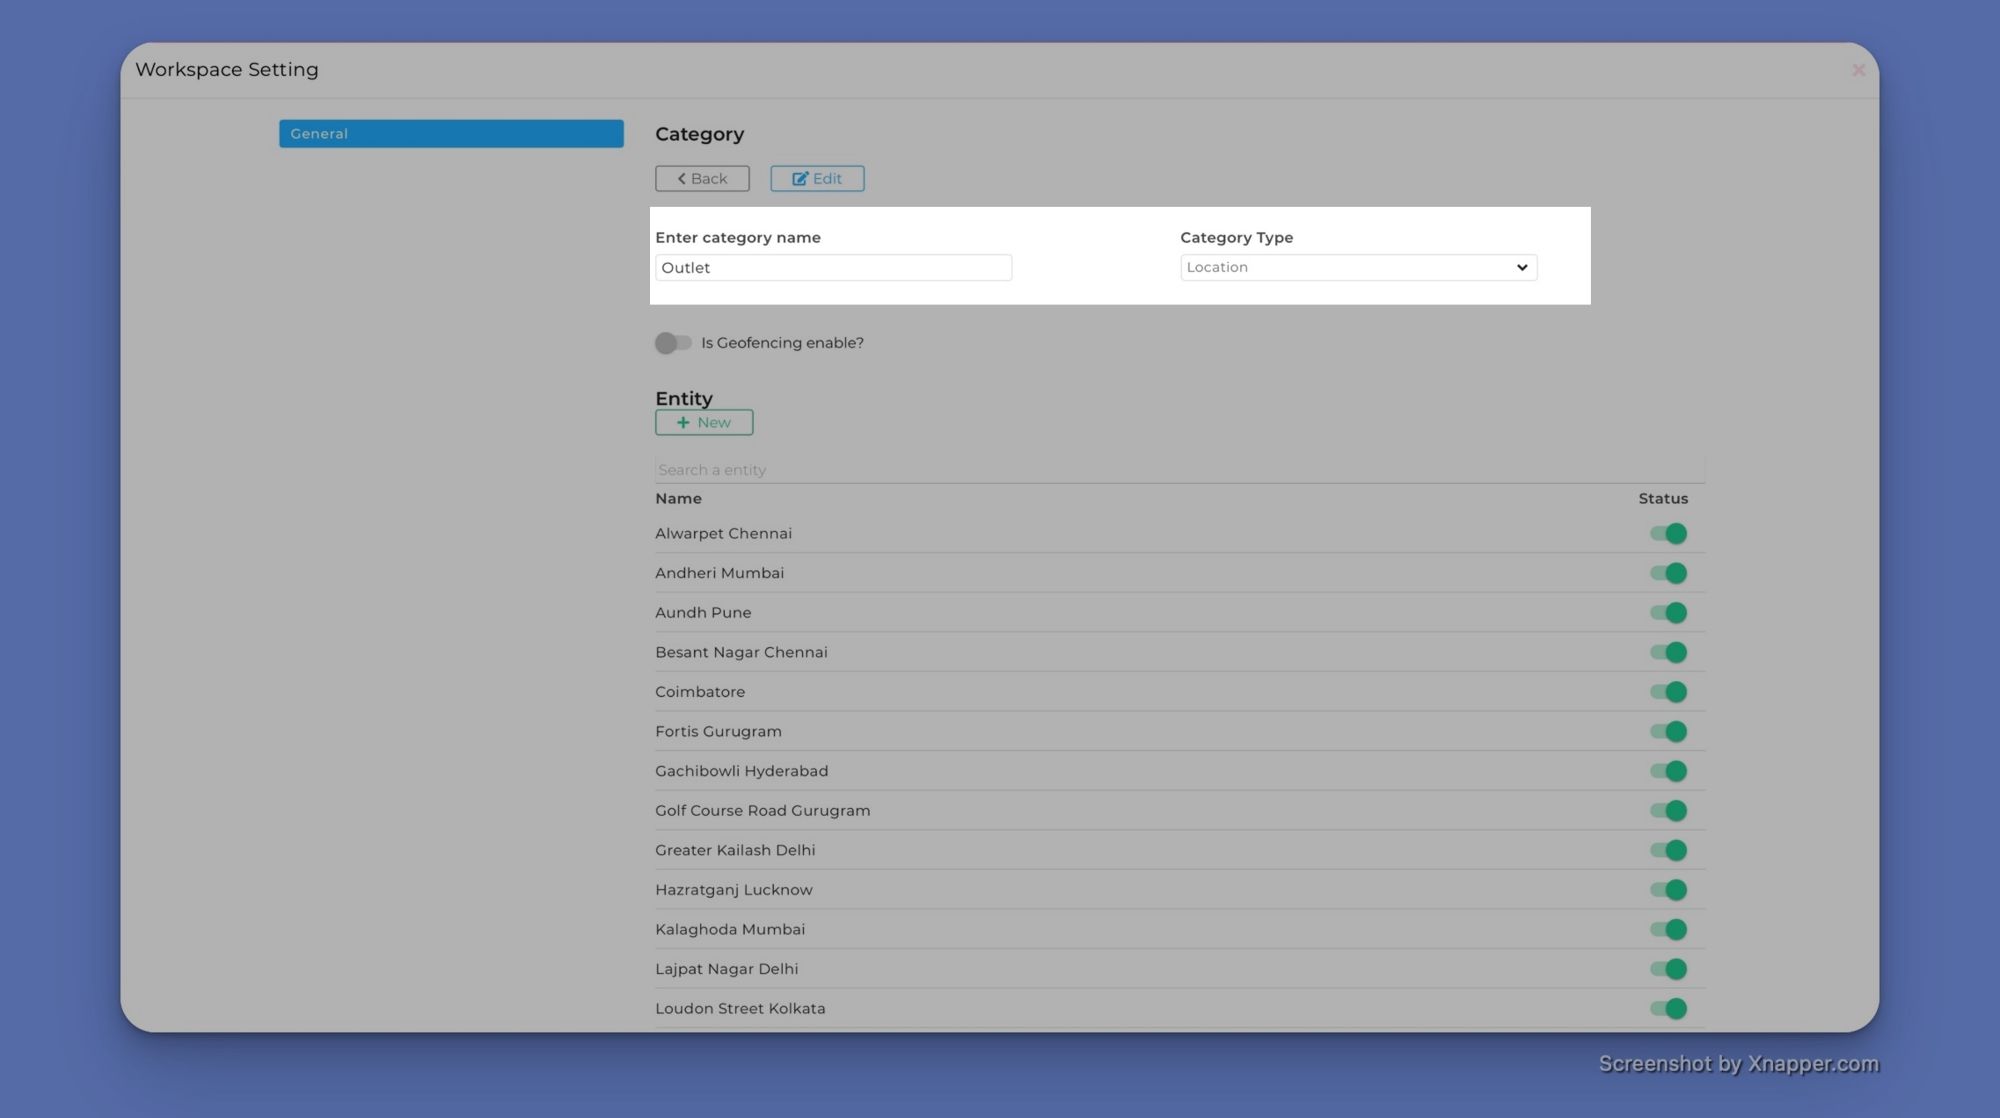
Once you create a new category, you have the option to add entities to it. If the category is ‘Restaurants’, the entities would be the individual outlets. If the category were ‘Equipment,’ the entities would be the individual pieces of equipment (like a fridge, coffee machine, grill, etc). You don’t have to add entities to a category right away, but when you do you saving a category will reveal a button to create a new entity on this page.
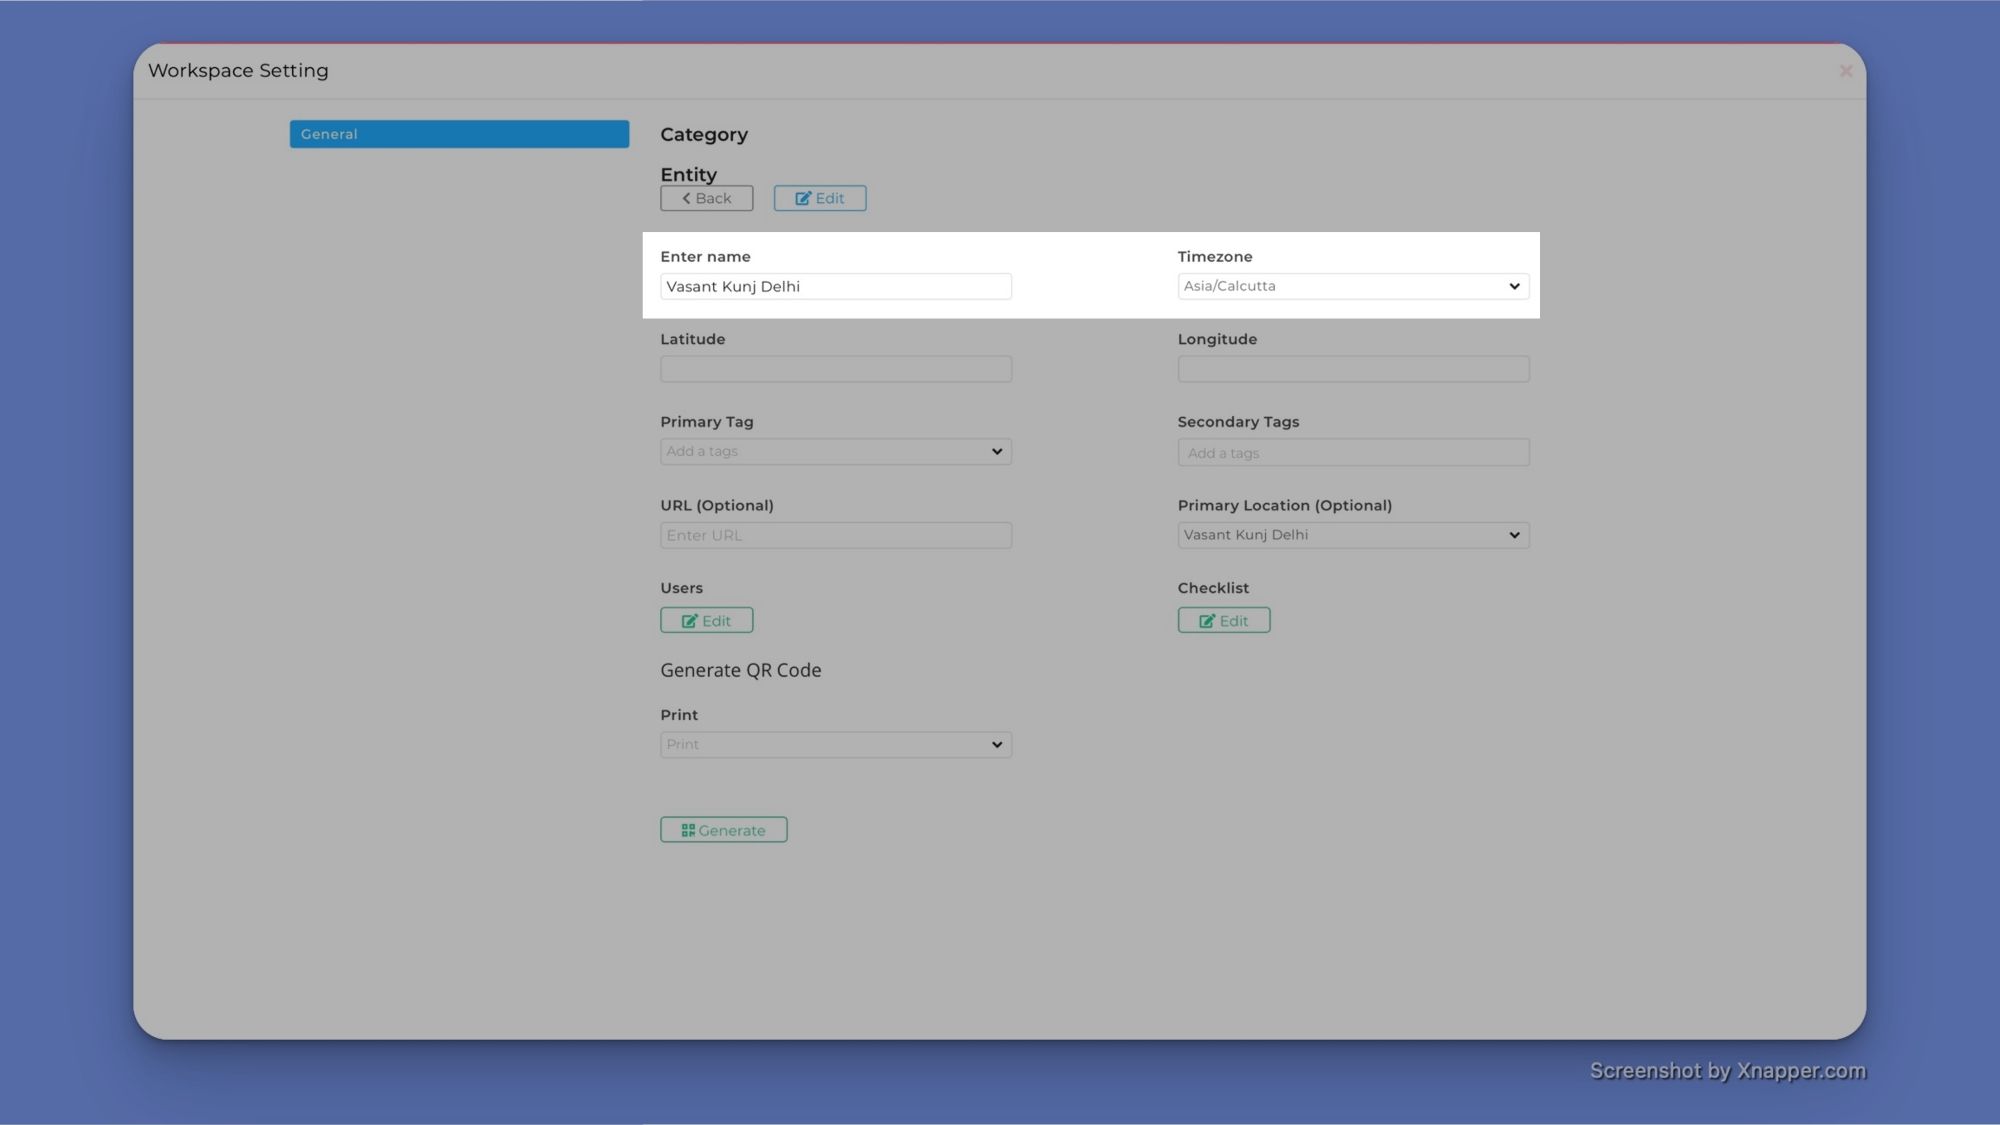
When creating a new entity, you only need to provide a name and a timezone for the entity. You can also provide geo coordinates for location-based entities. You can add tags to organize your entities or print out A QR code so that employees can instantly bring up a checklist by scanning a QR code posted on a piece of equipment or in a location.
You also have the option to assign users and checklists to individual entities. However, we don’t have any users or checklists created yet, so let's return to this once we’ve created some.
2. Creating your first checklist
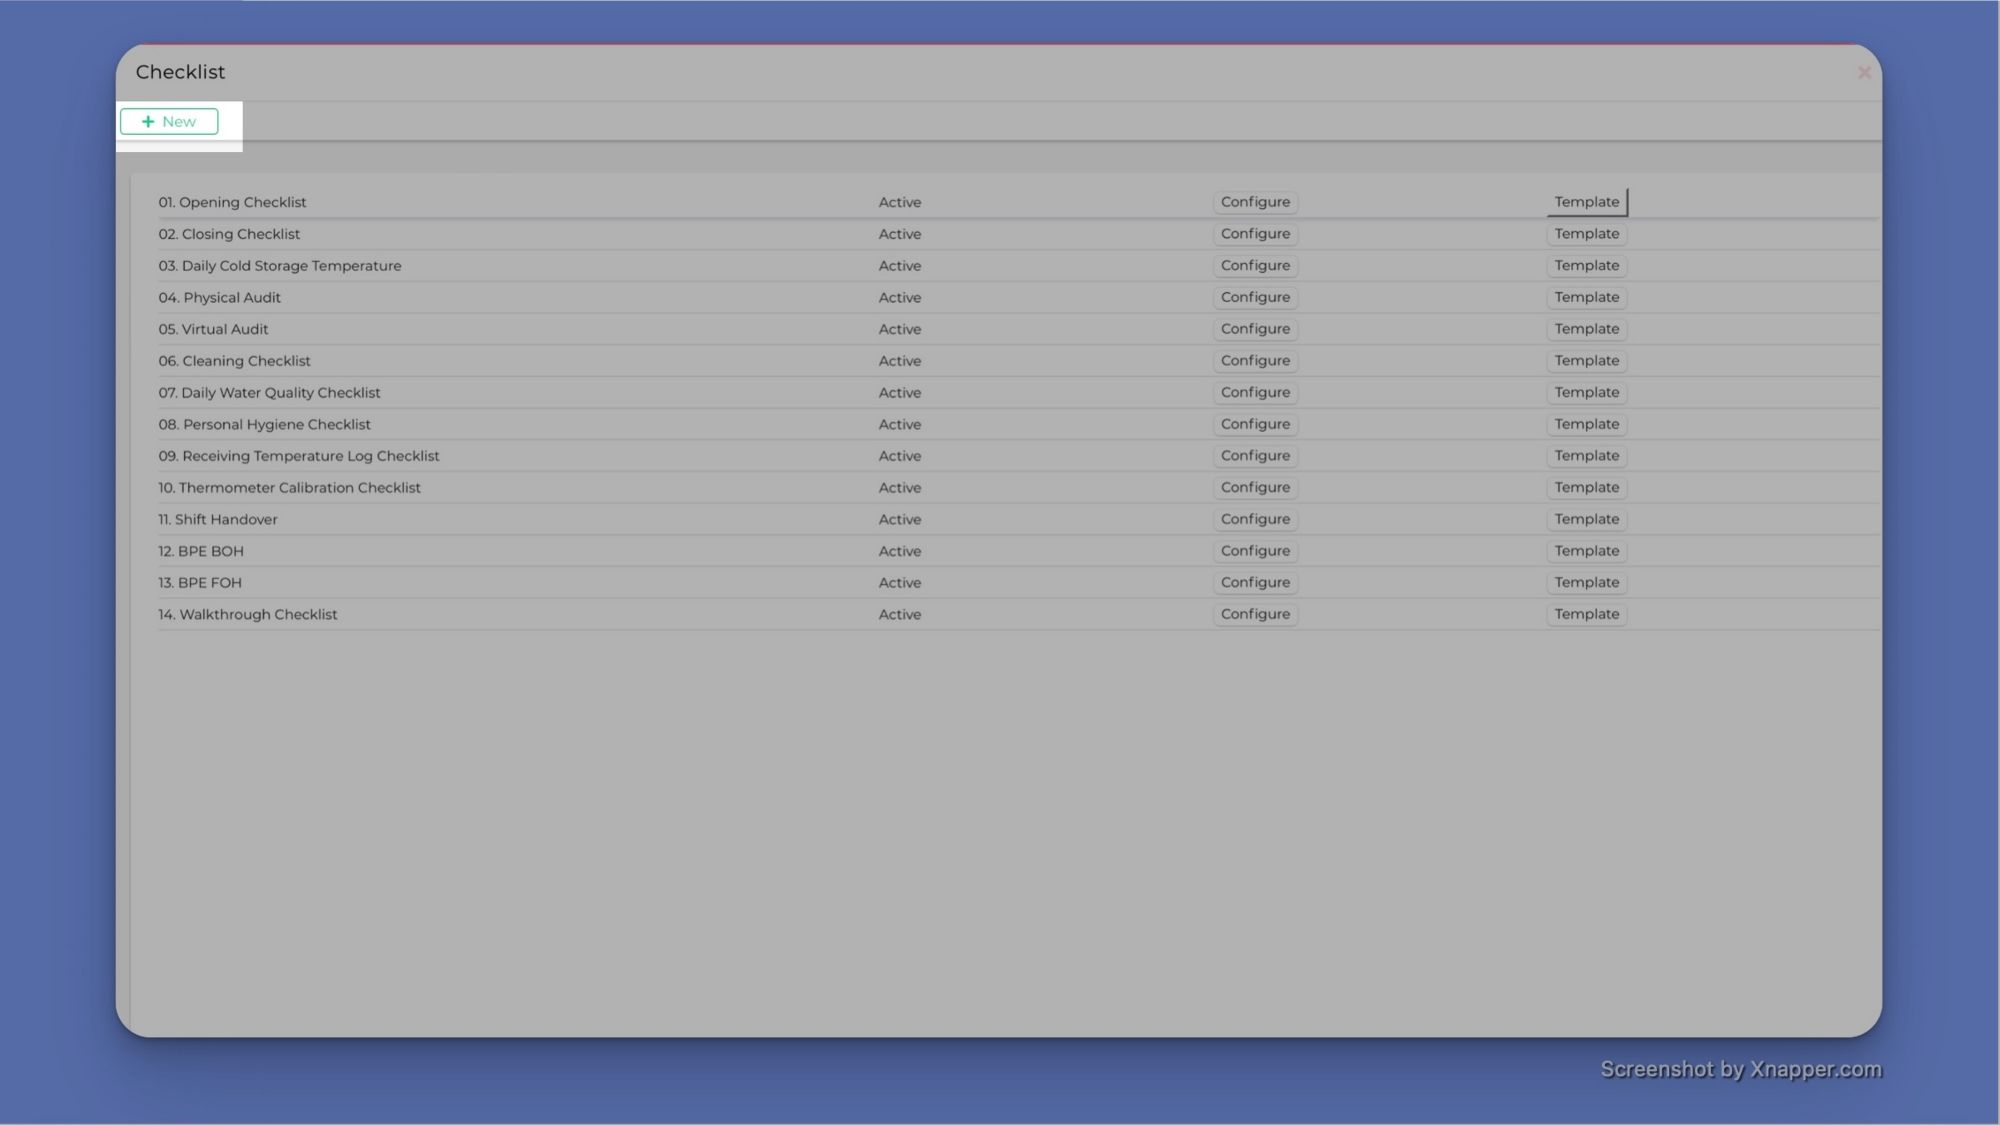
Once you have your categories set up, clicking on the gear icon in the top right corner of the highlighted checklist section at the beginning of step 1 (highlighted in yellow below), you will be taken to a screen with all of your existing checklists
As you can see in the sidebar highlighted above, you can create as many different kinds of checklists as you want.
- You can create a checklist for a specific person.
- You can create checklists for a particular restaurant area, for example, an opening or closing checklist just for the bar area.
- You can duplicate checklists so that they’re in different languages
- You can use a checklist for keeping logs on a specific piece of equipment. For example, documenting regular espresso machine checks.
- One of the companies even uses checklists to upload a list of daily expenses so that a manager can approve or reject them before forwarding the list to the finance team.
Before we get into adding approval layers and routing checklists to other departments, let's start by creating a basic checklist, by clicking on the gear icon in the top right corner of the highlighted checklist section in the home screen above.
The ‘+New’ button in the top left corner of the checklist screen will let you create a new checklist.
The checklist creation page has ten mandatory fields:
- A name for your SOP
- The category this SOP belongs to (which we already created in step 1)
- Geolocation - whether you want this SOP to include location data when filling out.
- Edits after submission - Whether or not the SOP can be modified in the future
- Energy reading - whether or not this checklist is specific to an energy reading.
- Status - whether the SOP is active. You can disable SOPs by marking them inactive at any point.
- Geofencing - If you want completion of this SOP to only be possible within a certain location radius. This ensures that an employee must be on site for them to be able to complete a checklist.
- QR Scan - whether this SOP can be accessed by scanning a QR code
- Scheduling - If this SOP will be scheduled for a specific time
- Approval - whether or not the SOP requires approval before an entry can be marked complete.
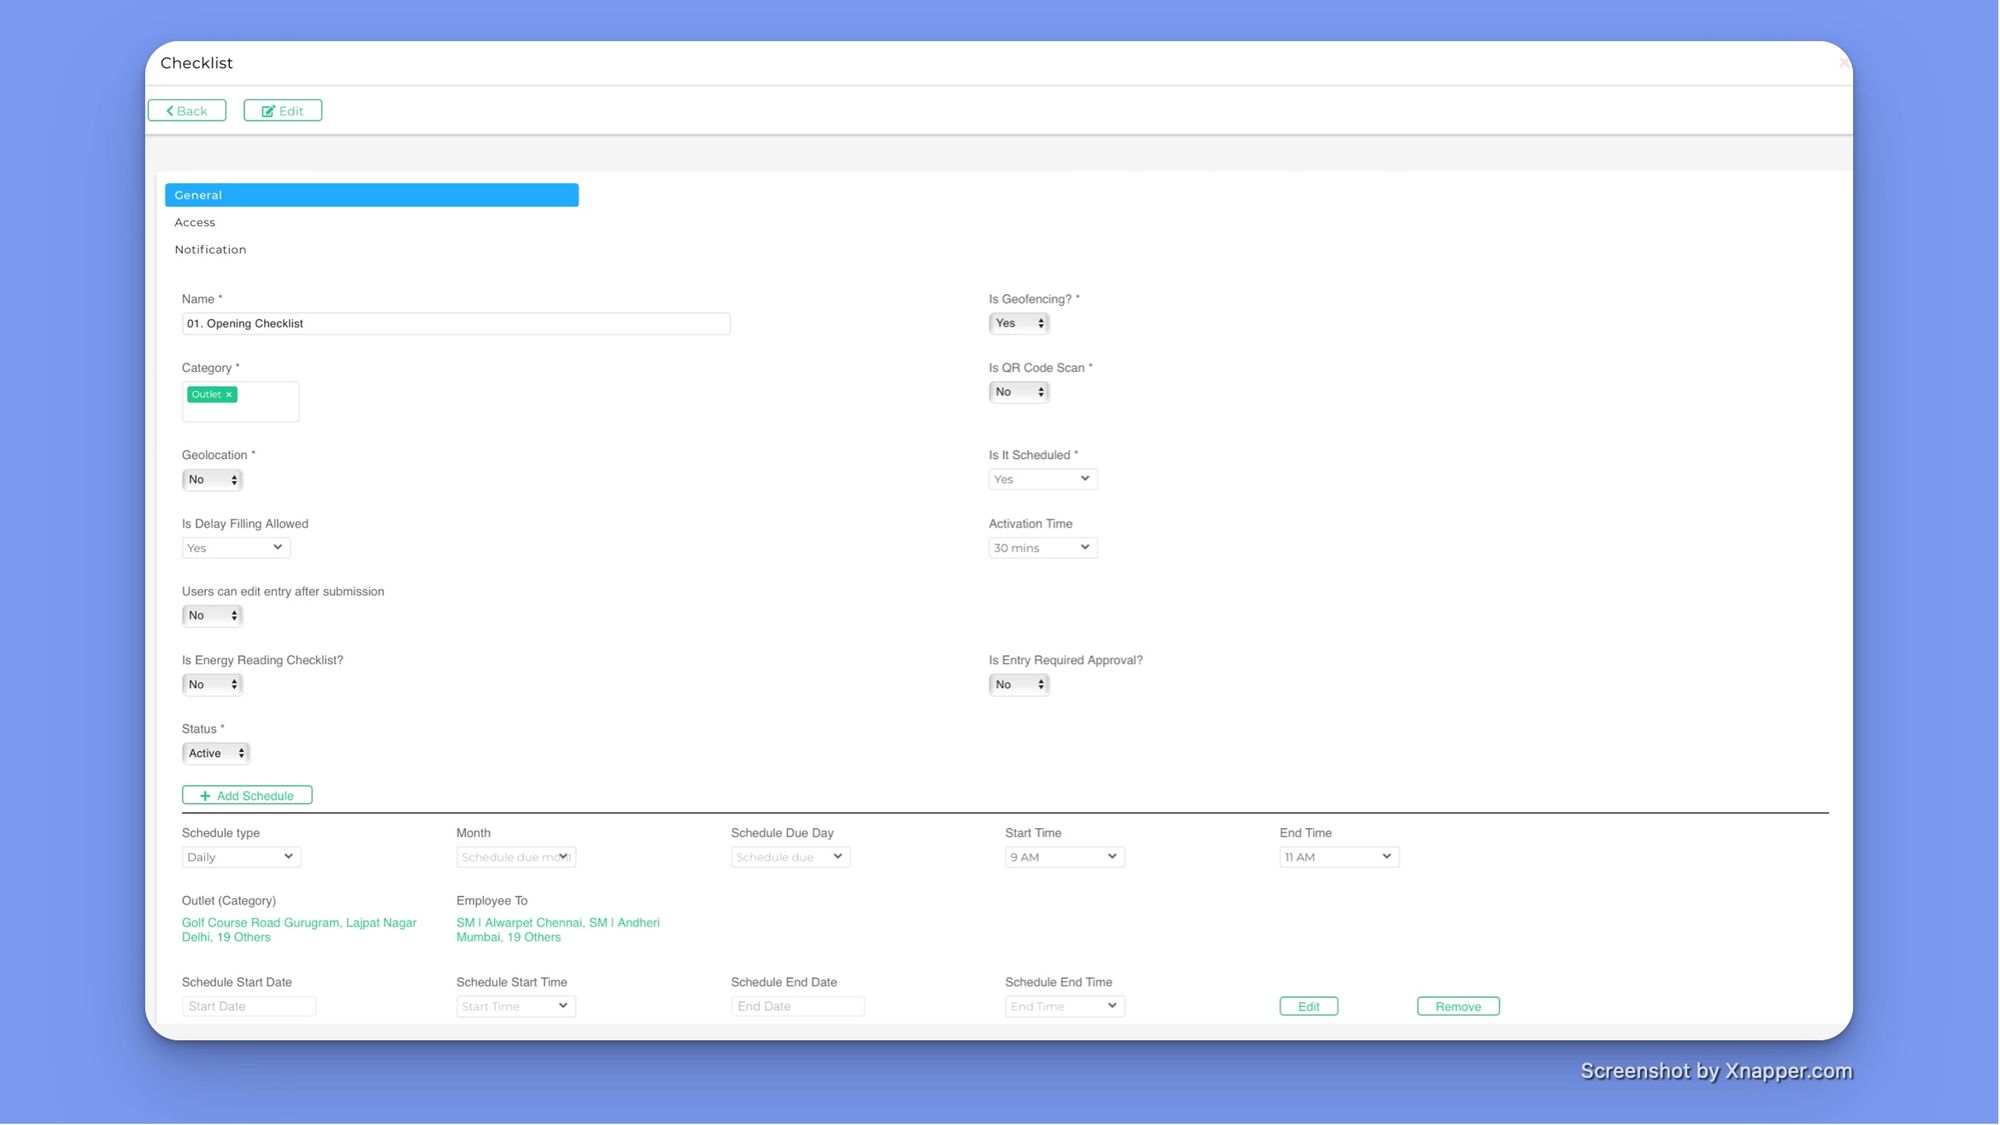
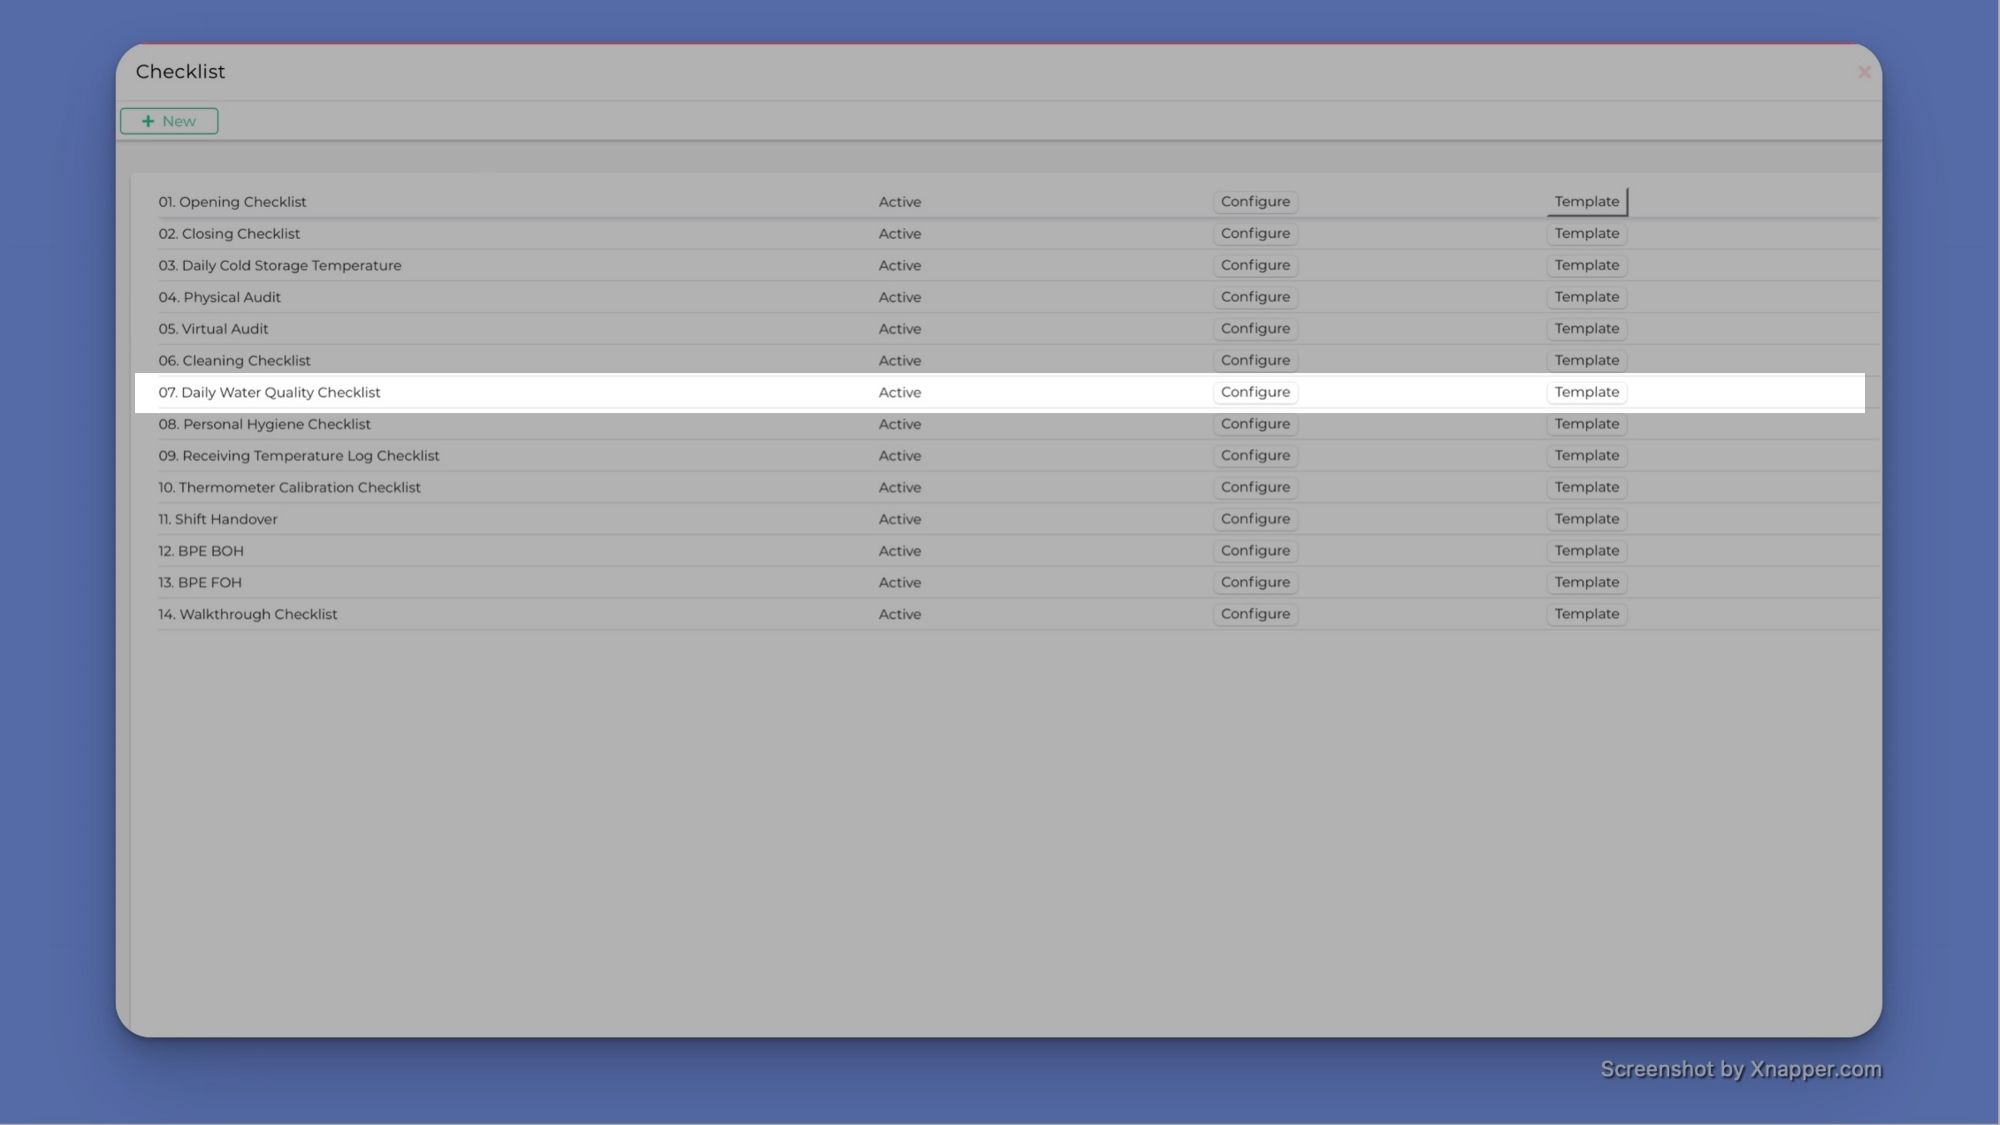
Once all the checklist fields have been added and saved, the checklist will be added to your list of checklists on the previous page. From here, you can click on the template button on the far right to begin creating your checklist.
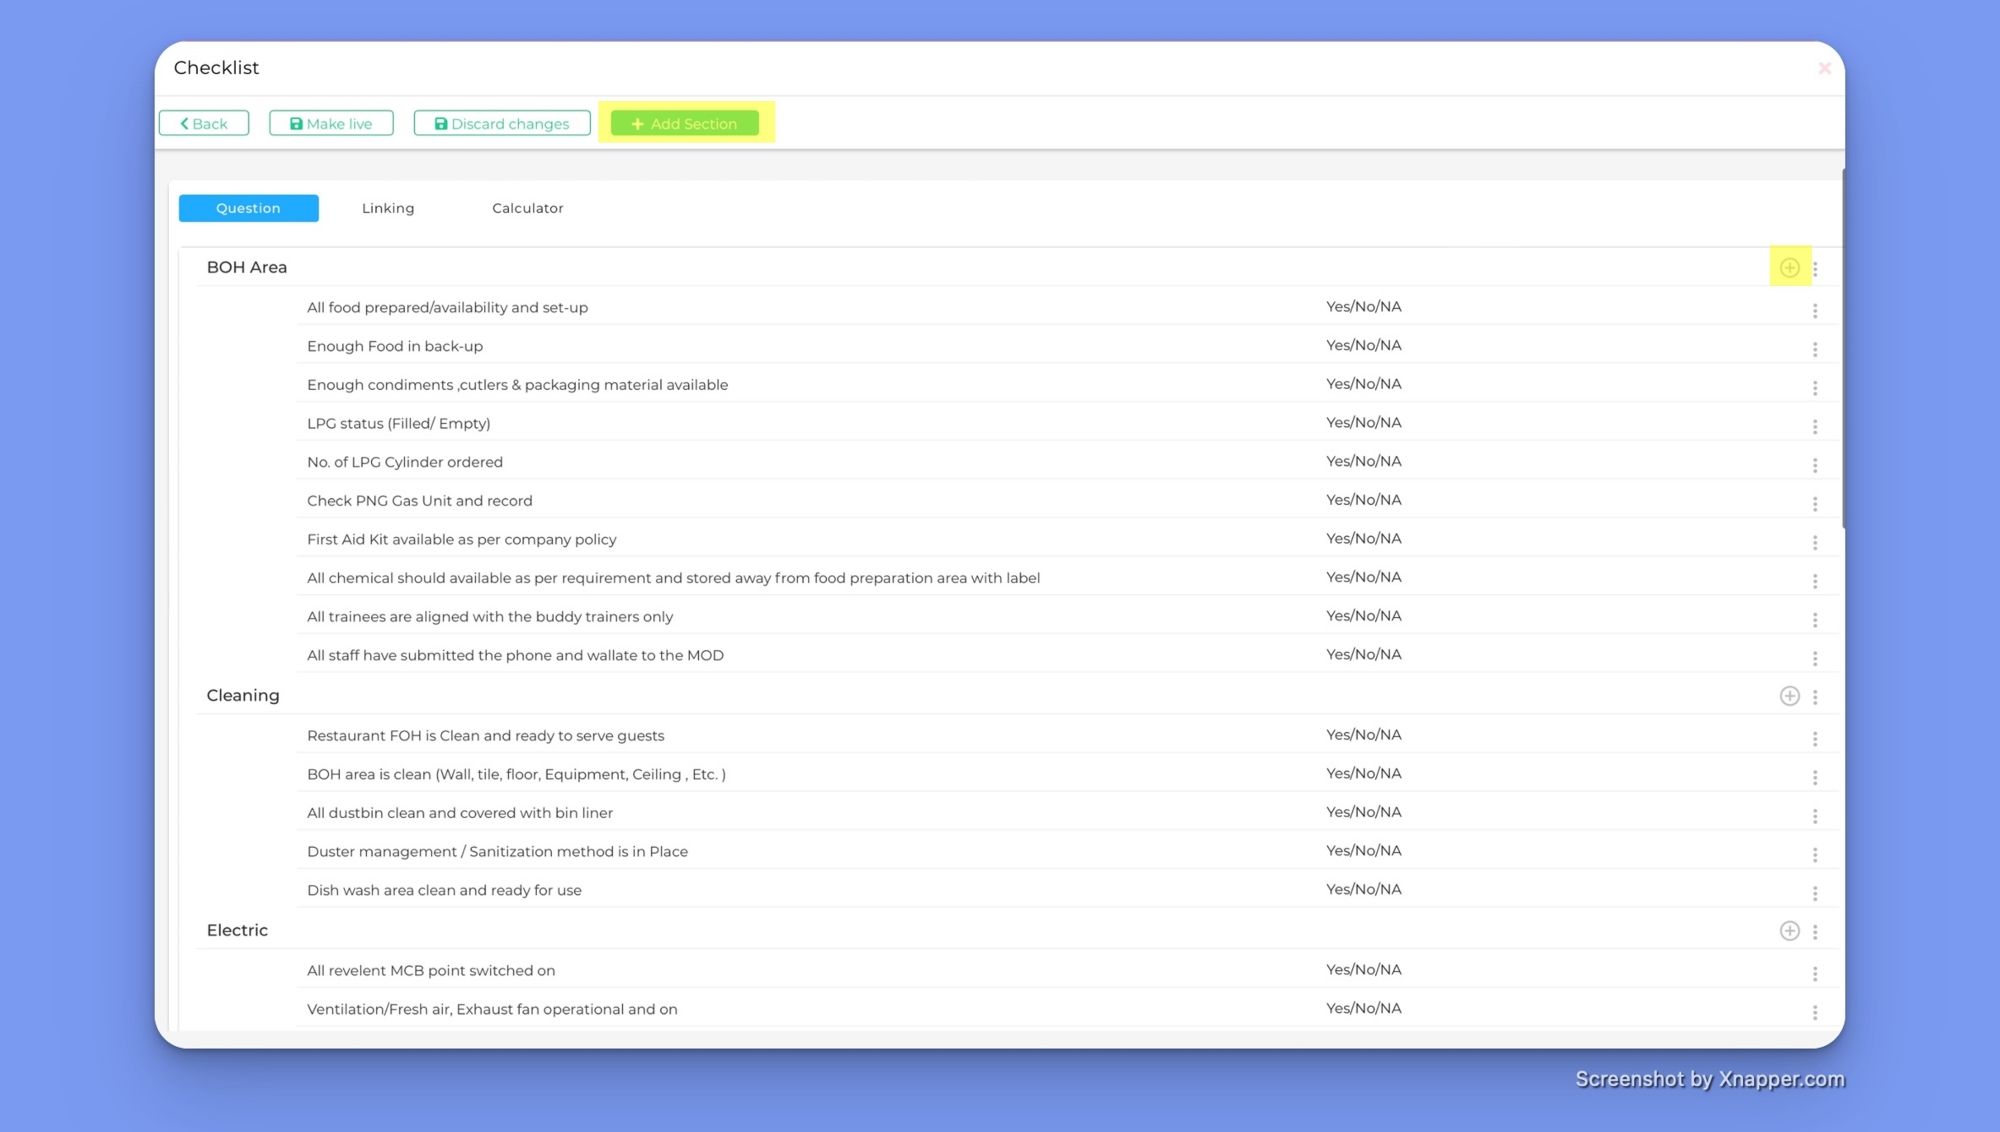
The template area lets you add sections and tasks to a checklist. You can add new sections with the ‘Add Section’ button in the header (highlighted in yellow in the image below), and you can add tasks to each section by clicking on the plus button on the far right of a section (also highlighted in yellow).
Adding a task to a section brings up a task details modal. All you must include is a question or task description. In this instance, let's call the task on our first checklist making sure that there is a ‘Menu and Tent card available on the front counter’. You also have the option to add up to 3 images to the task. This would be helpful if there were lots of light fixtures and you wanted an image of which ones to avoid any confusion when completing the task.
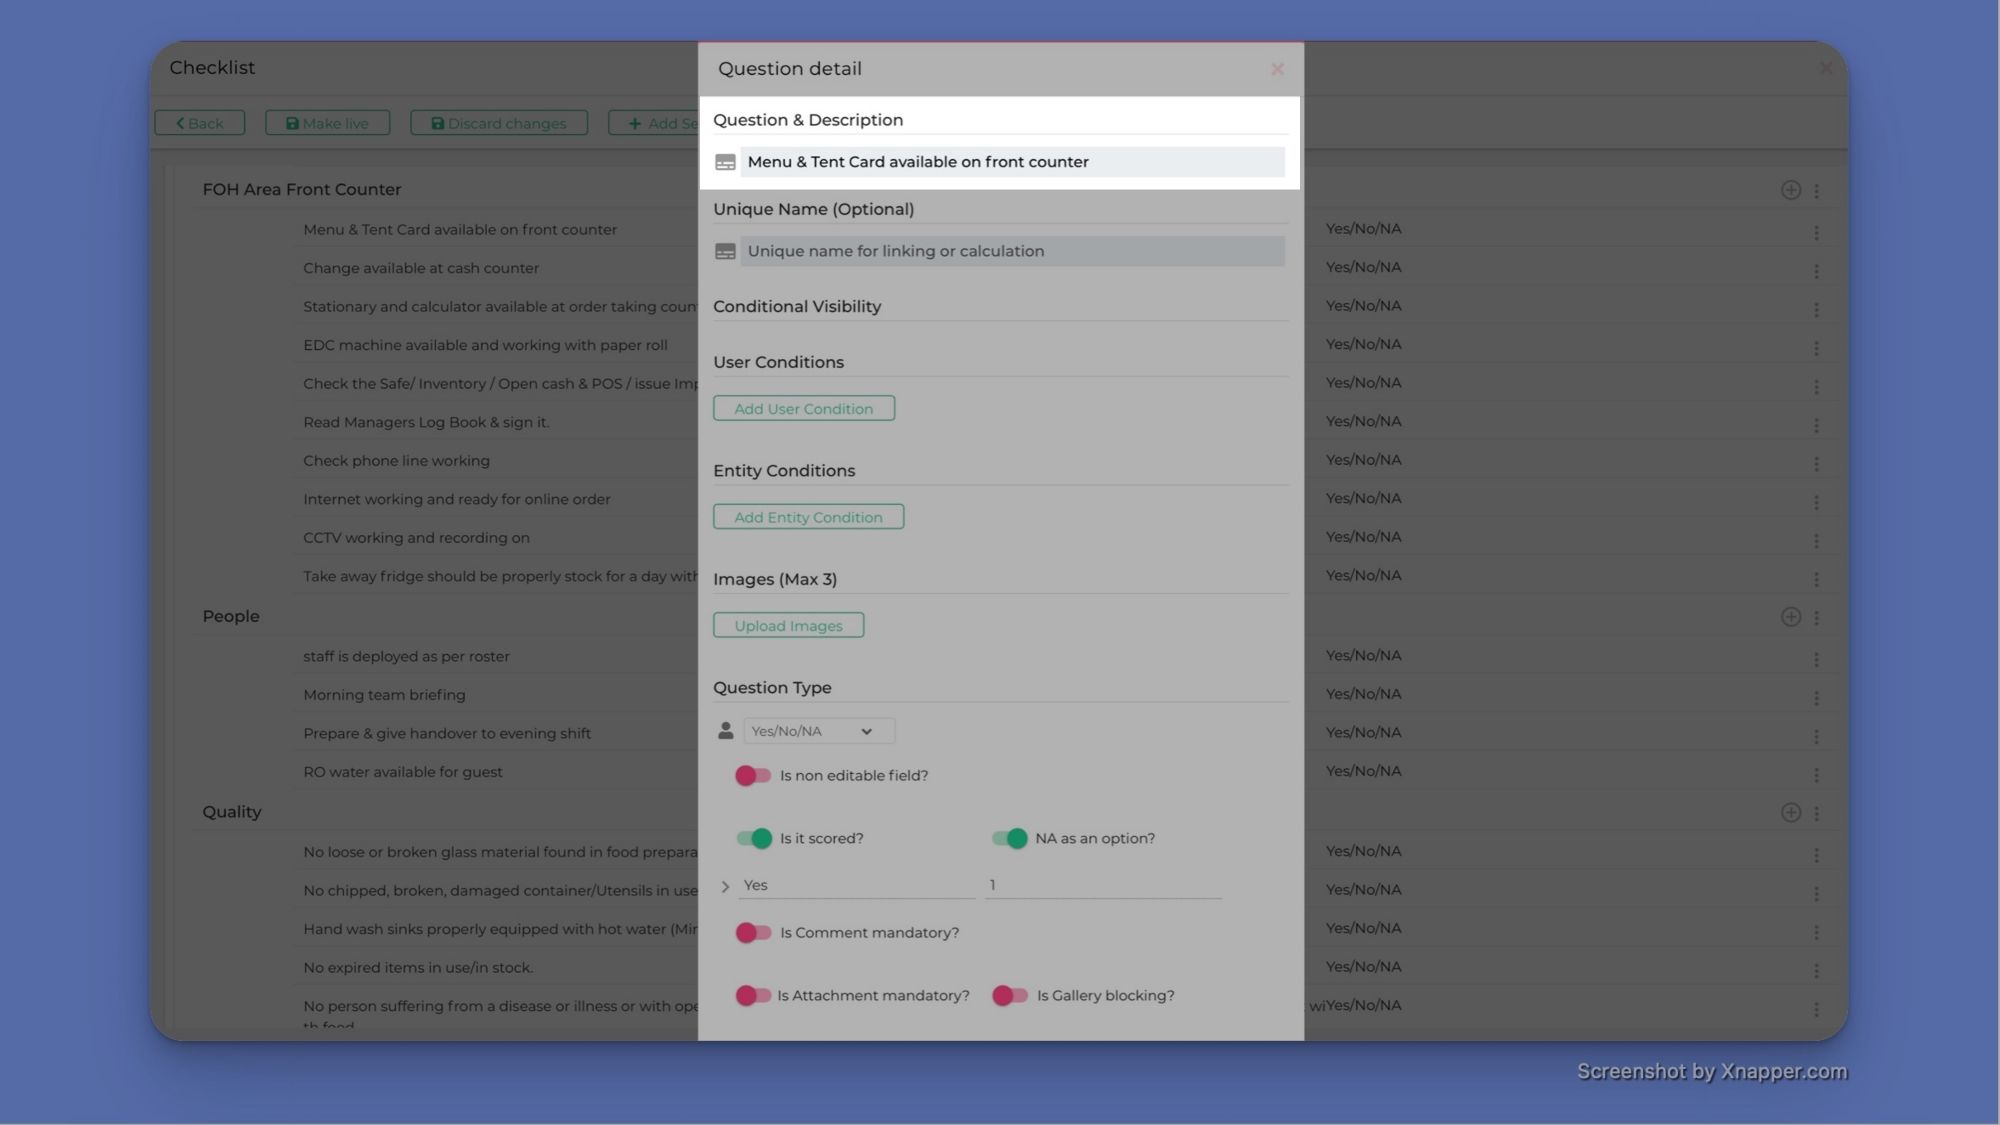
You can also add a unique name for a task that allows you to perform calculations with the inputs. For example, if the checklist were a procedure for closing out the till at the end of the day, then one of the tasks would be to report the final total for the day. If this field is assigned a unique name, then the value on this task could be linked to the starting value the next day. You could also perform calculations on tasks by assigning them a unique name, but that is beyond the scope of this post.
You can also add conditions to individual tasks by setting up tags for users or entities. For example, you could tag some employees as belonging to a ‘morning shift’ and others as the ‘afternoon shift’. Then you only show some tasks to some shifts using these condition settings.
Finally, you have the question type option, which lets you control how users answer the question. Your options are:
- Attachments - require someone to upload an image or file to answer the question
- Comments - require someone to add a comment complete the task
- Date - requires someone to fill out what date they completed something
- Dropdown - lets people select from a predefined range of options
- Number - forces the response to be a number value only
- Percentage - forces the response to be a number value only
- Text - This is a basic text input
- Time - requires someone to fill out what time they completed something
- Yes/No - A basic yes or no response option
You can mix and match different task types and create as many sections as you want. Once your SOP is complete, you publish it by clicking on the ‘Make live’ button on the template page.
3. Assigning someone to a checklist
Now that you have your checklist set up, the last step is to assign it to someone. Adding new users to your PeakScale workspace happens in the ‘Manage Workspace’ setting in the main dropdown in the top right-hand corner of the home page.
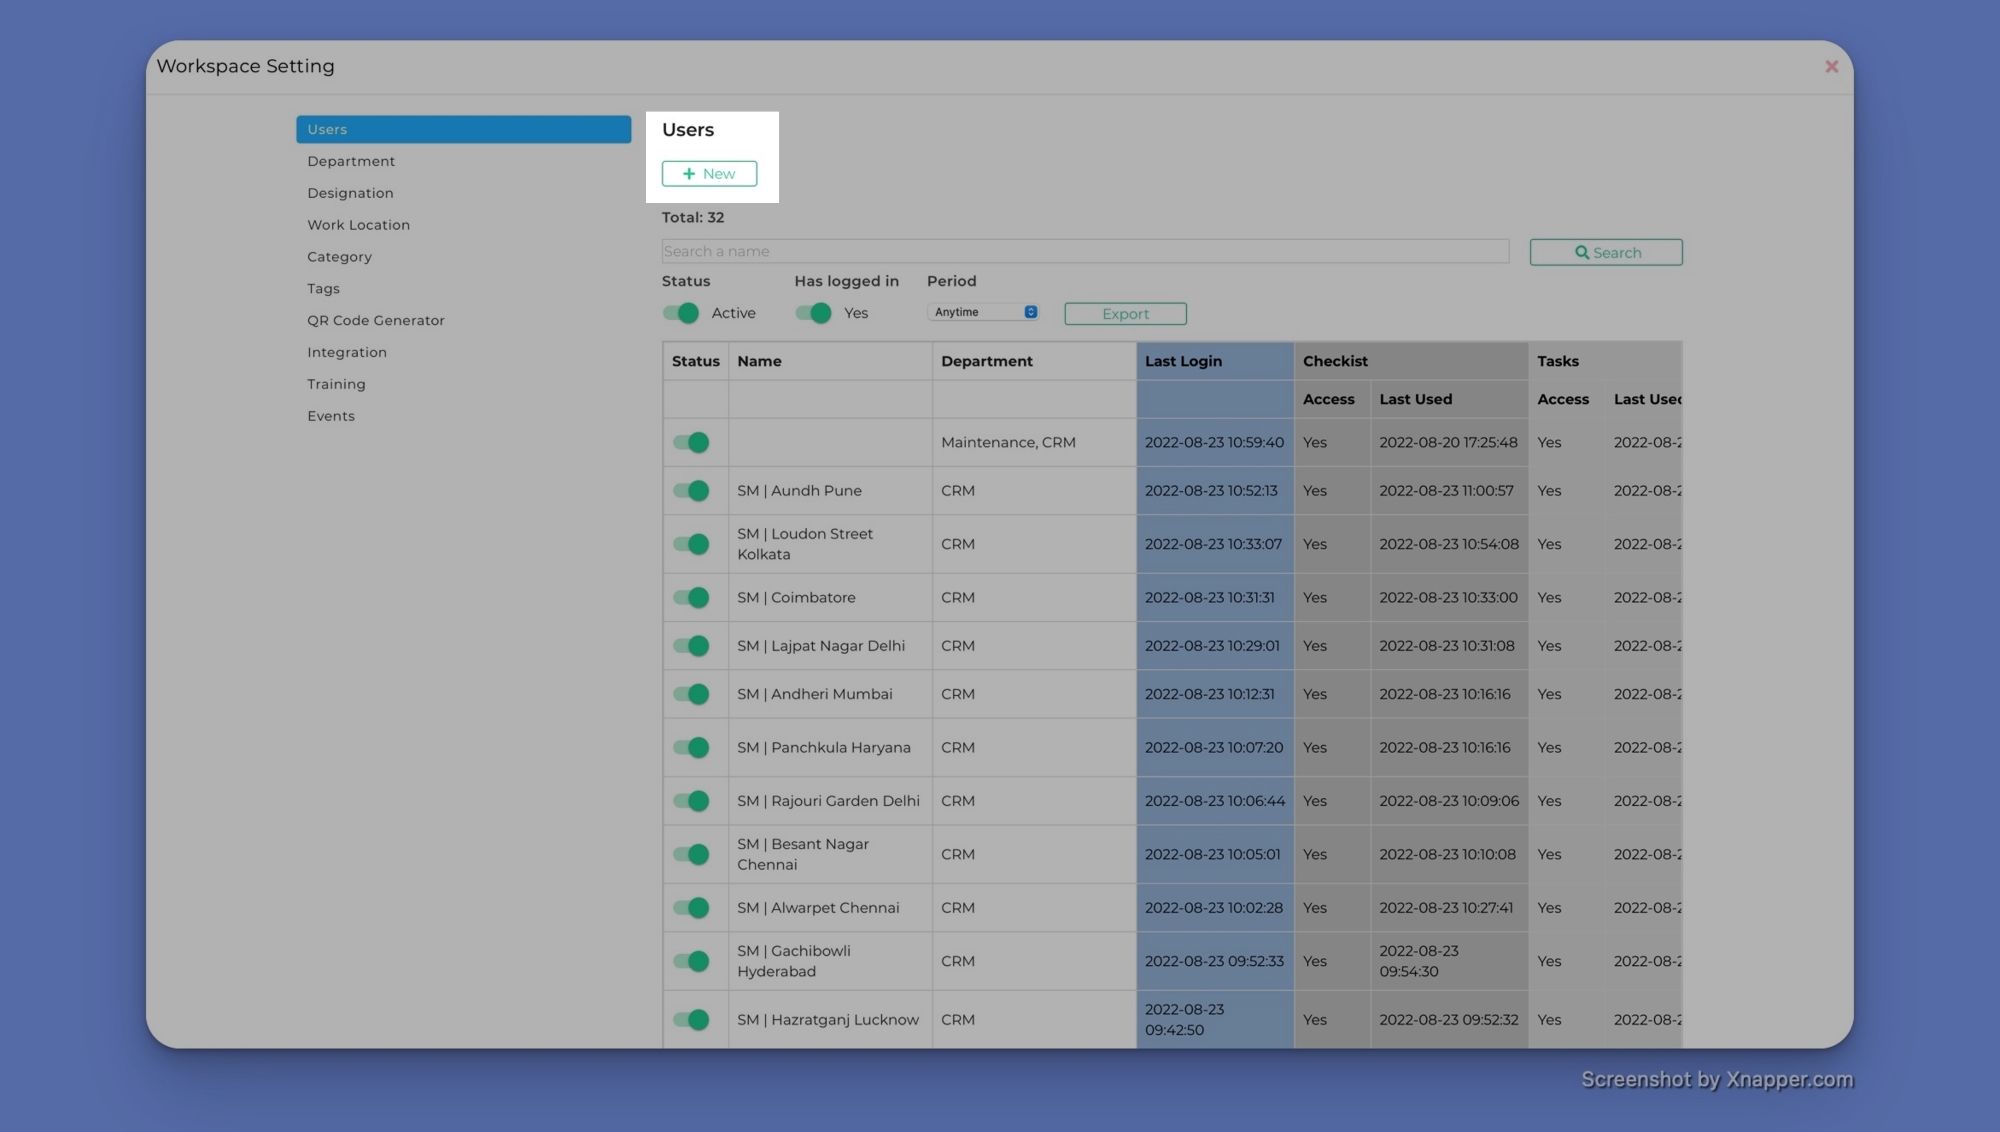
The first option in the right-hand panel of the workspace settings page is the ‘Users’ tab. This page shows you all of the people you have invited to your workspace. It lets you control their status, and shows you what departments they belong to, what access rights they have, and when they last logged in. To add new users to the workspace, click on the ‘New’ button at the top of the beginning of the page.
You will be prompted to fill out a user profile where you can add their name, email, and user details. Once saved, they will be sent an invite, and you will get access to a new tab on the left-hand panel called ‘Access’. This tab will let you control which sections of PeakScale the user has access to and which categories of checklists they can access. In this post, we only explore the checklist module. PeakScale also has a helpdesk module for internal questions, task management capabilities, and a team training module, and you can control which users have access to which modules.
The access tab for individual users will also display all the checklist categories you have created and lets you control which categories and entities they can access. In this instance, if we wanted the person we just invited to complete our first checklist, we would add them to the ‘Outlets’ category and select all the outlets we only created so far.
4. Completing an SOP as a team member
When someone has been assigned a checklist, they can access it from the sidebar when they login to PeakScale. Clicking on the individual checklist on the sidebar will open up a page in the main panel with all of the outlets where that SOP has been assigned (if the user has been assigned to more than one).
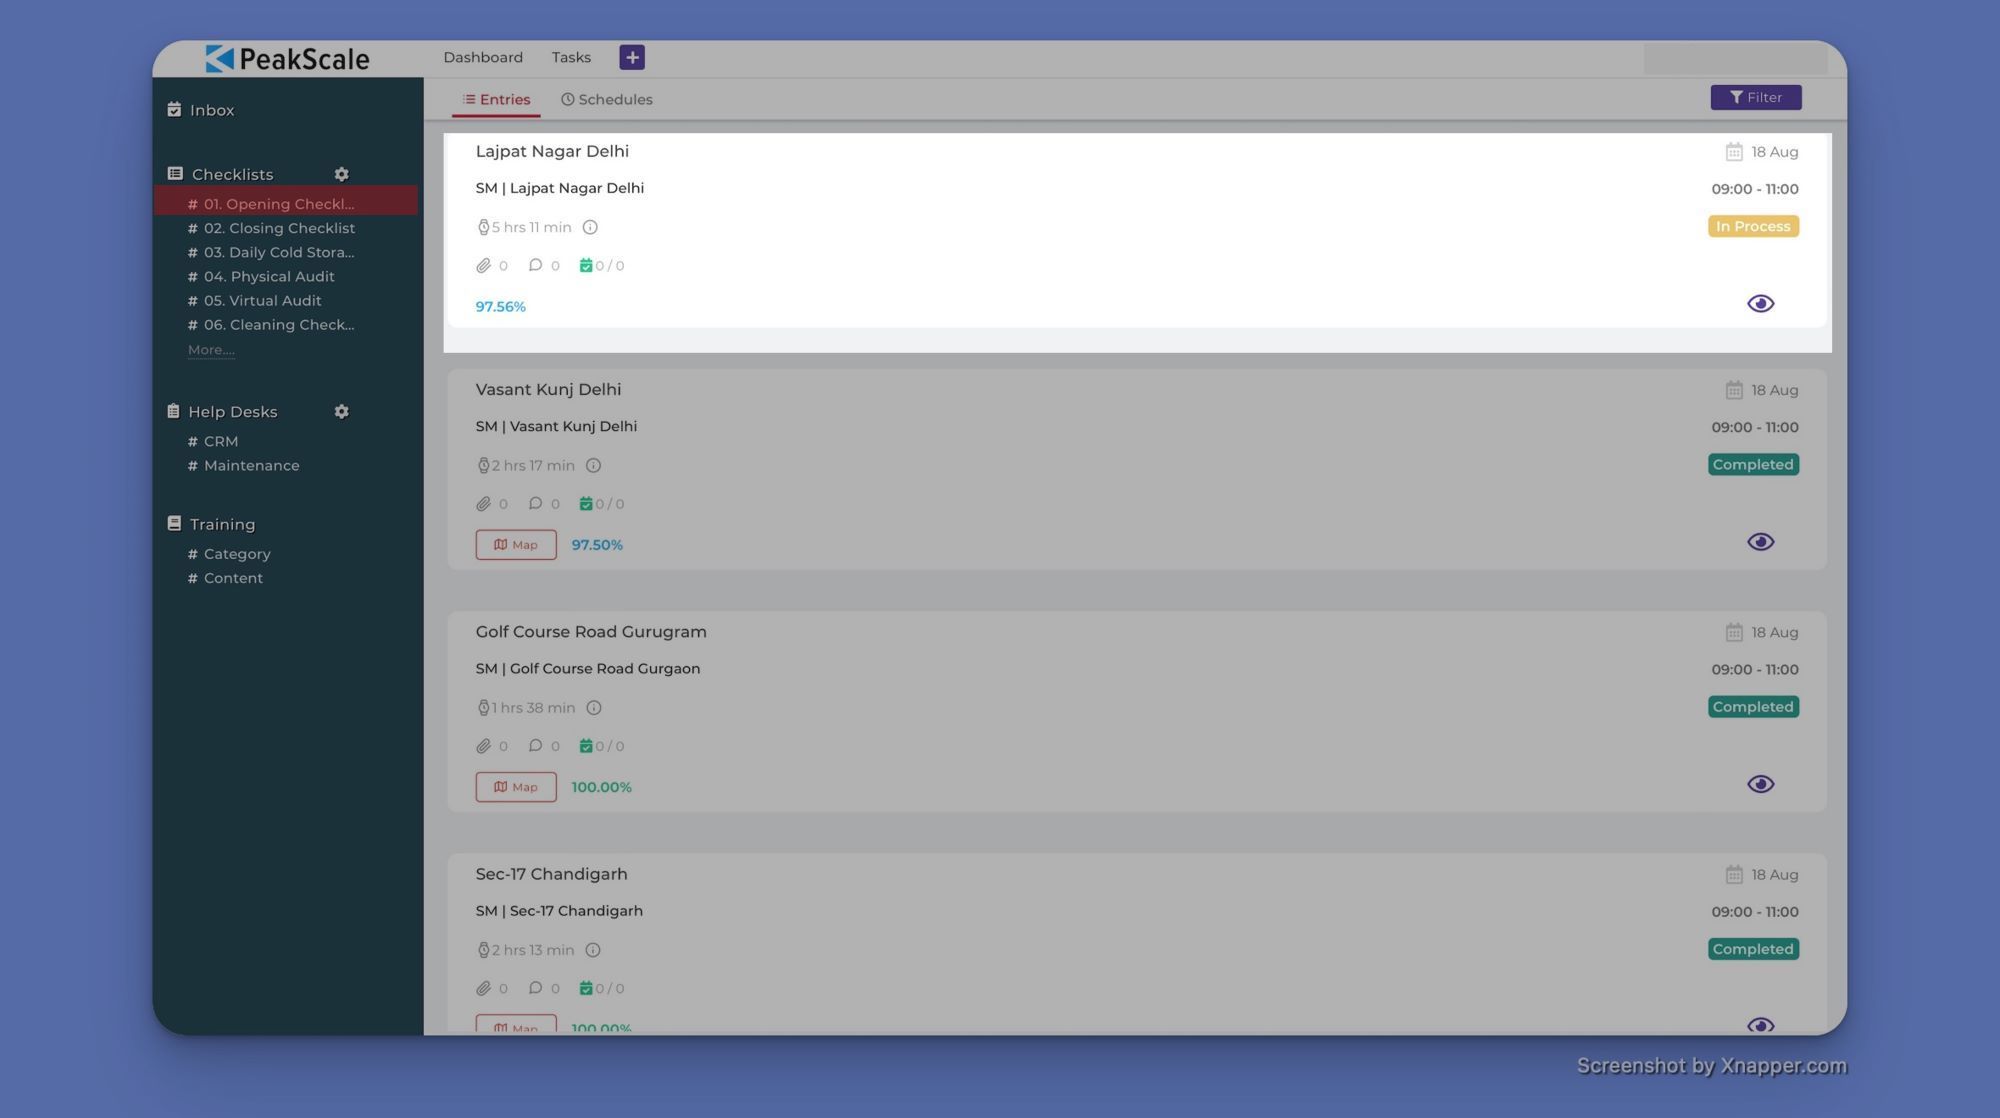
Clicking on the eye icons 👁 in the lower right-hand corner of an individual venue component will take you to the checklist for that venue.
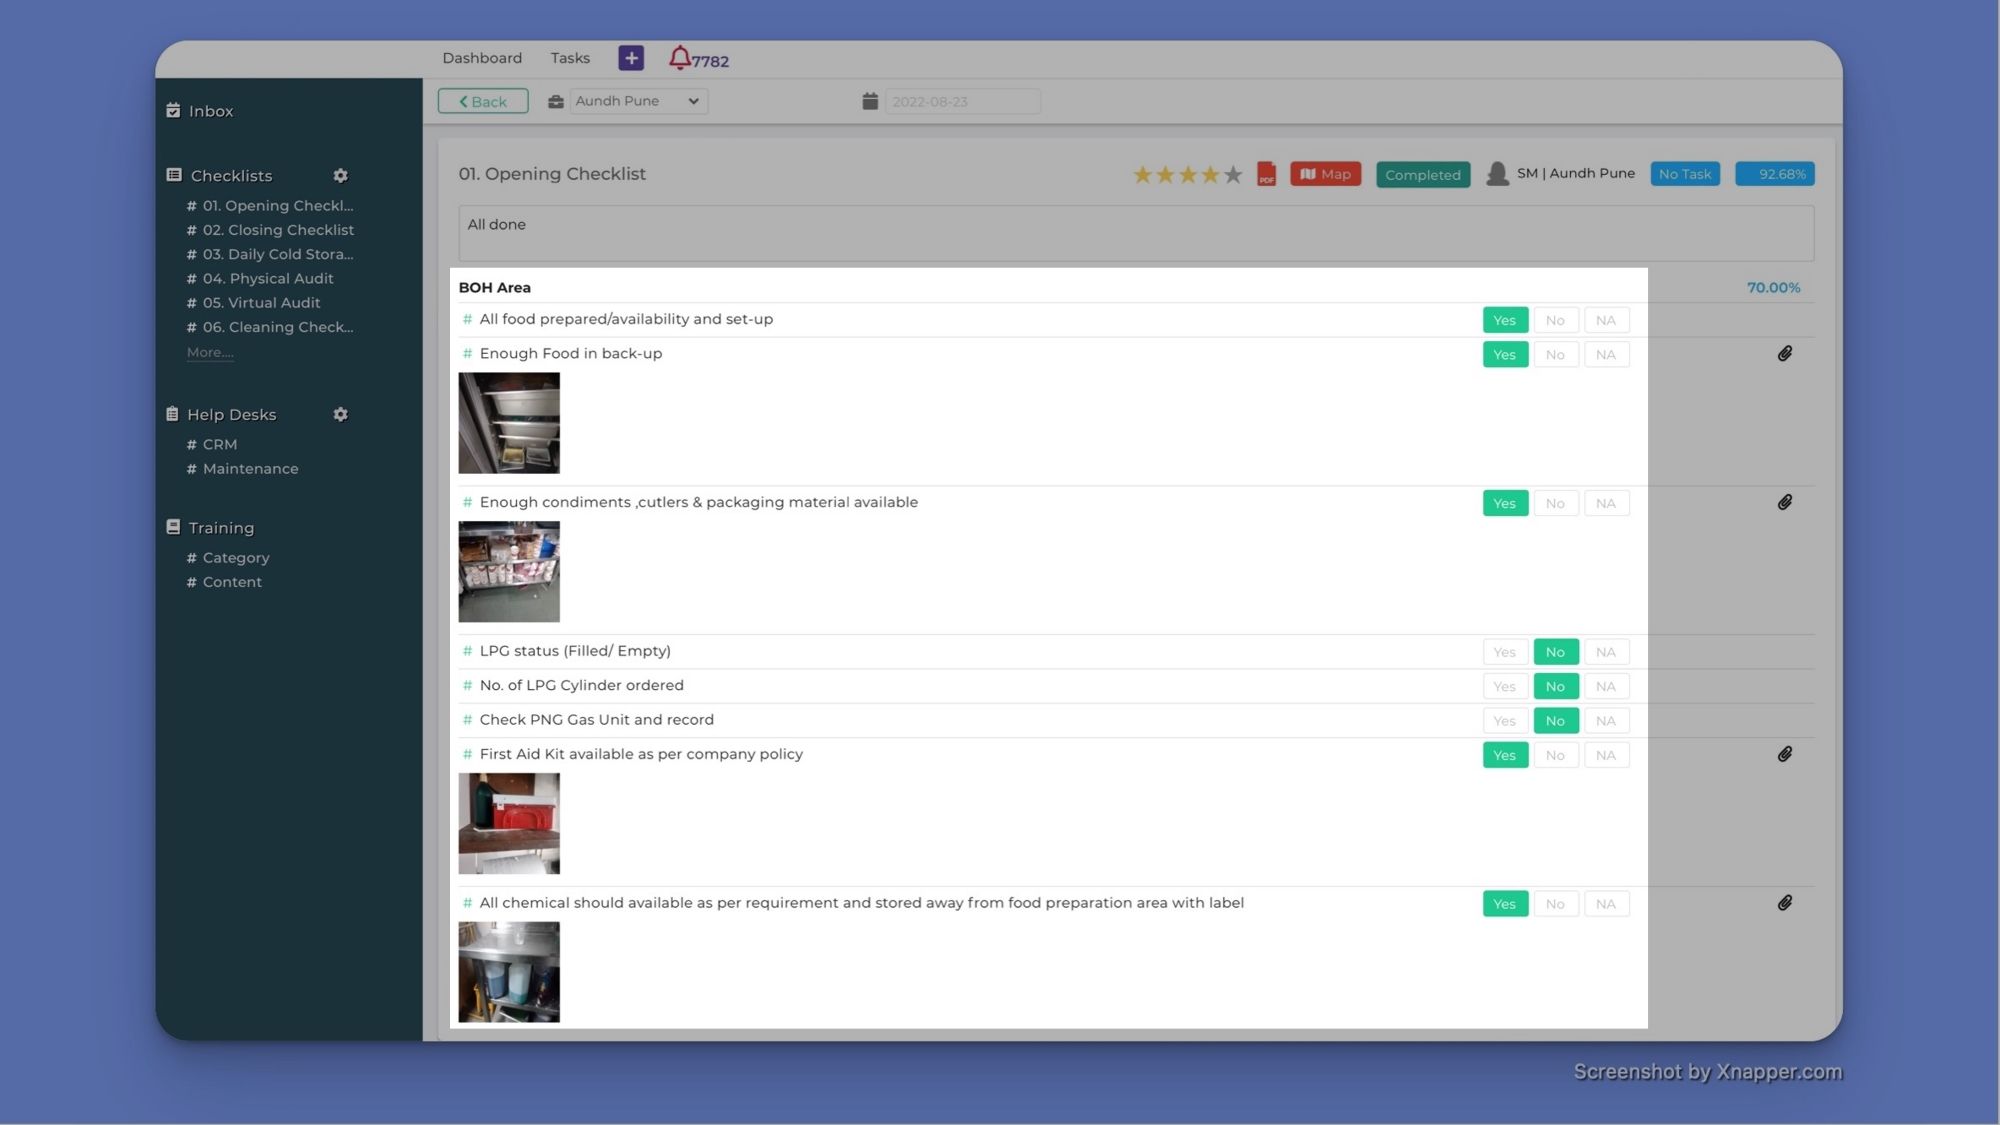
In almost all cases, this screen will be viewed on a mobile device by the person that is on the ground completing the checklist.
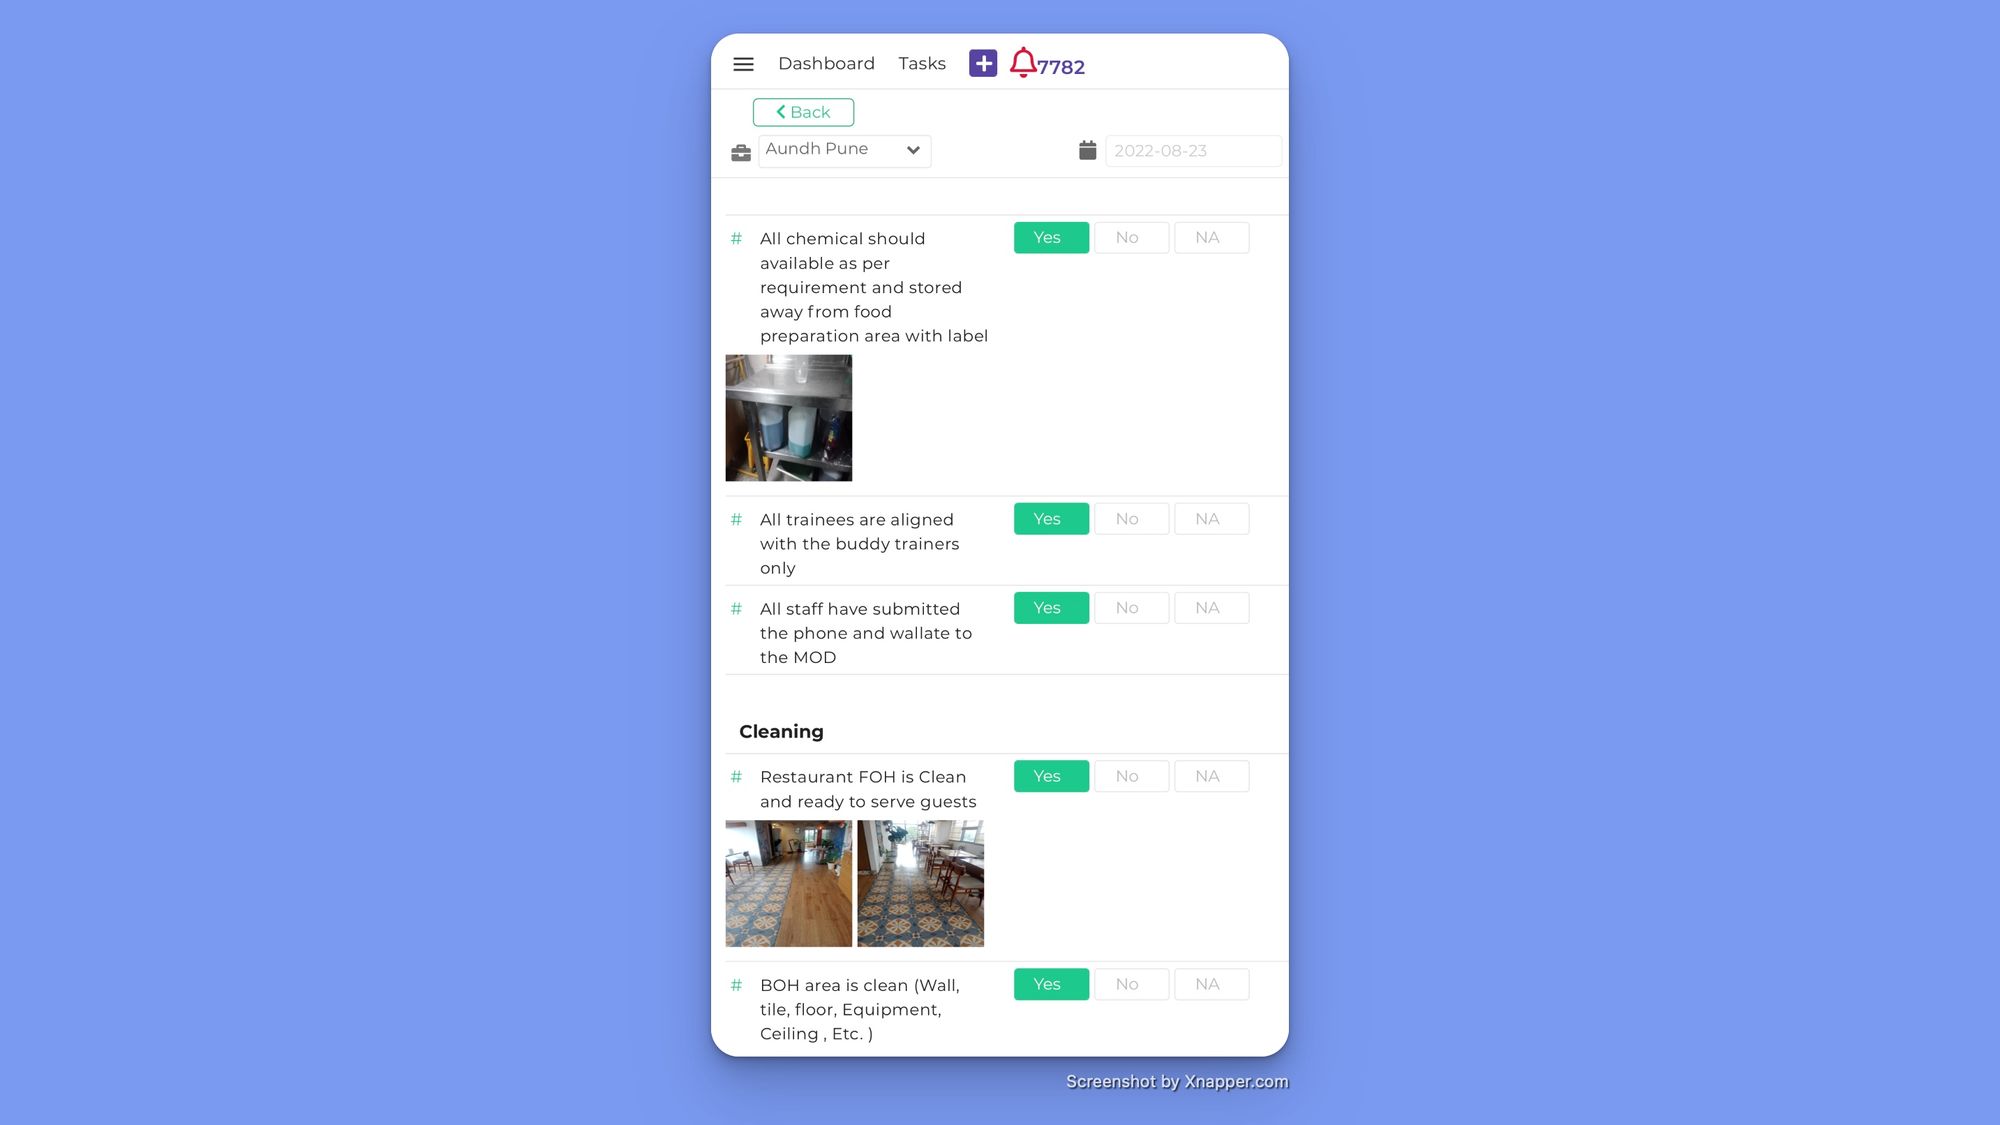
Using PeakScale on a mobile device is essential since employees will sometimes need to take pictures to complete a checklist. PeakScale also offers an option to disable gallery access on mobile devices. This ensures that the pictures were taken when they were submitted, as opposed to letting team members submit pictures taken previously.
5. Reviewing your performance
Once you have all your SOPs set up, the ‘Dashboard’ button in the navigation menu at the top left of the screen shows you an overview of all your checklists and how many have been completed on time.
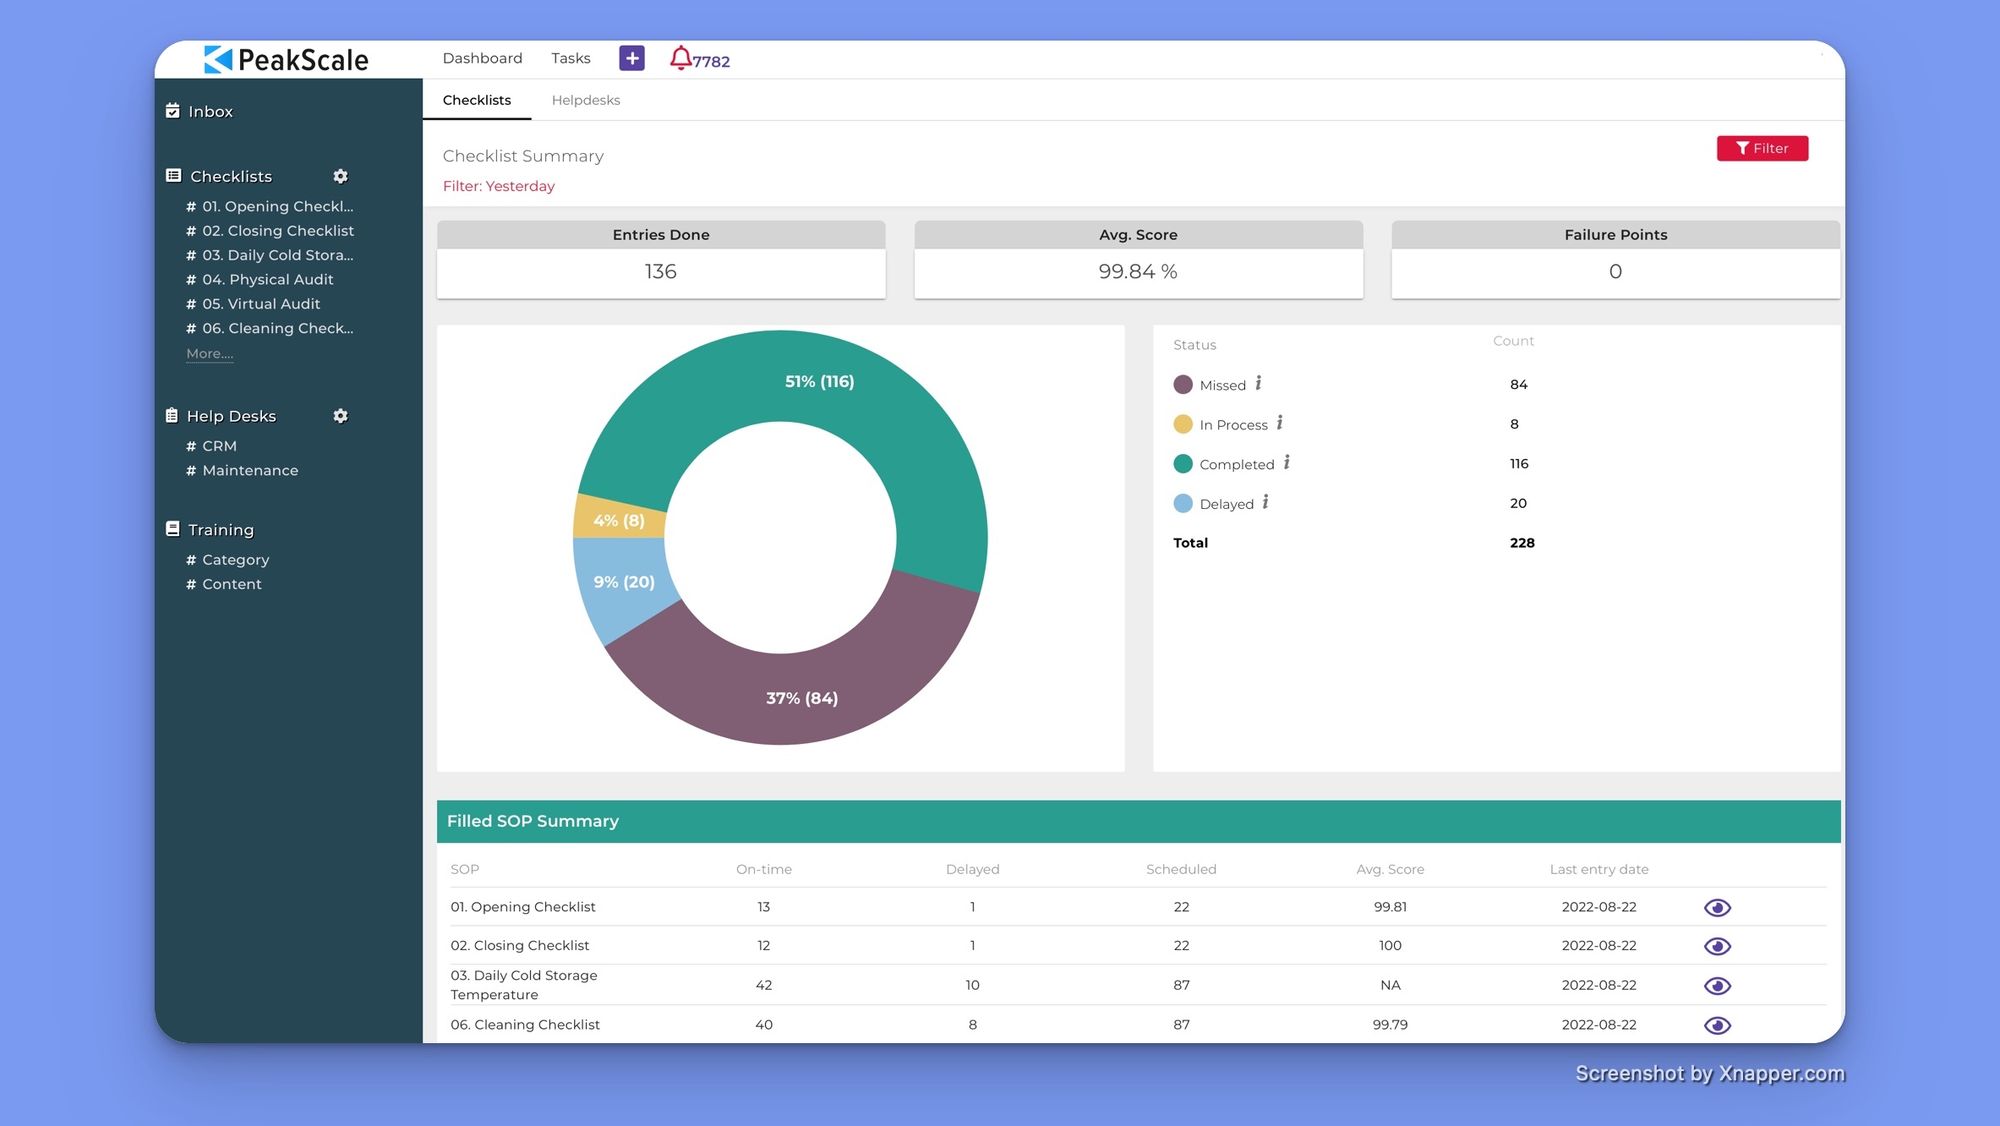
For example, in the screenshots above, the green section in the pie chart shows that 65% of your franchise's SOPs were completed on time, 26% were never completed, and the rest are either in progress or delayed.
You could then click on the 26% of the SOPs that were never completed for a more detailed breakdown of which SOPs were missed.
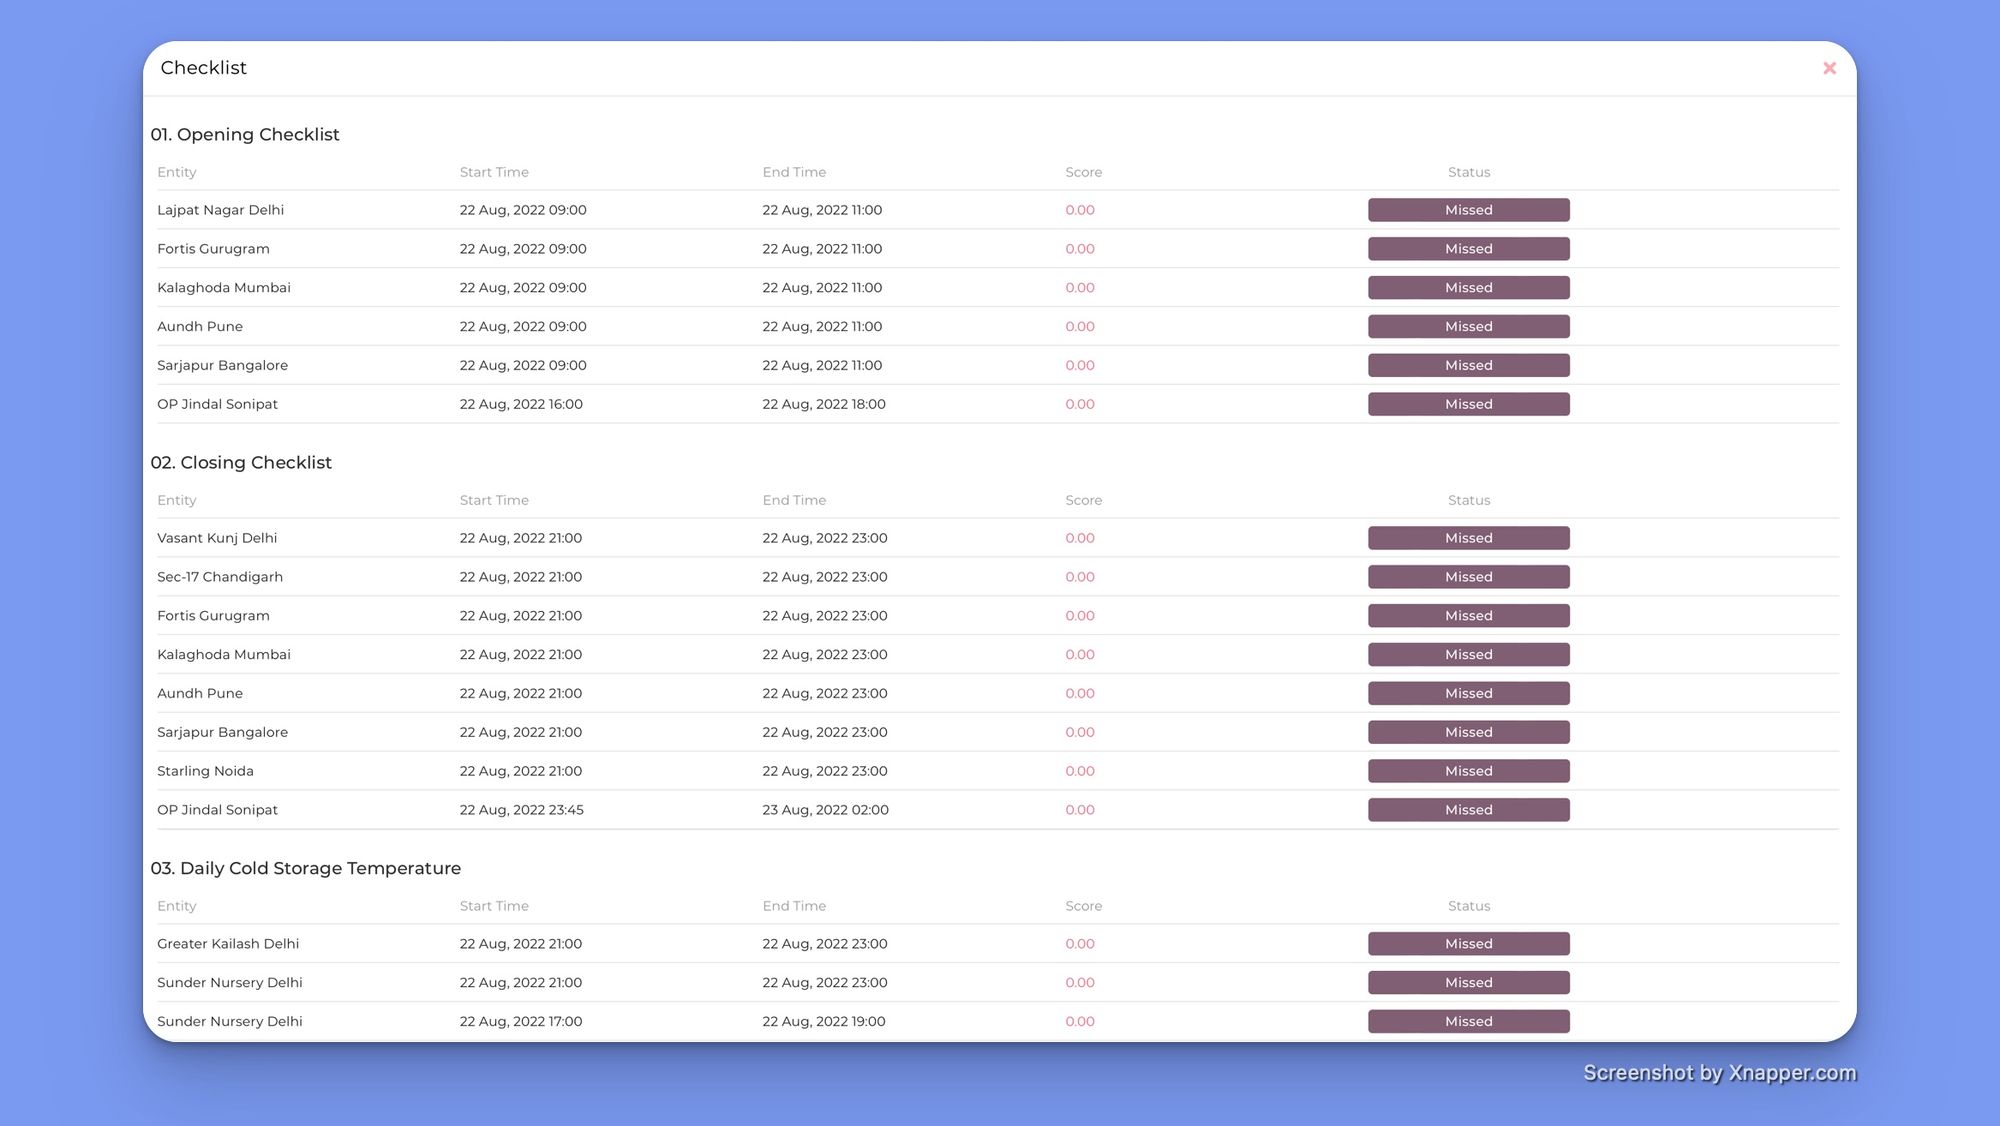
This shows you the exact SOP that was missed, who it was assigned to, and when it was supposed to be done.
By default, the checklist dashboard shows your stats for today, but you can also select the SOPs you want to include using the filter button in the top right corner of the screen.
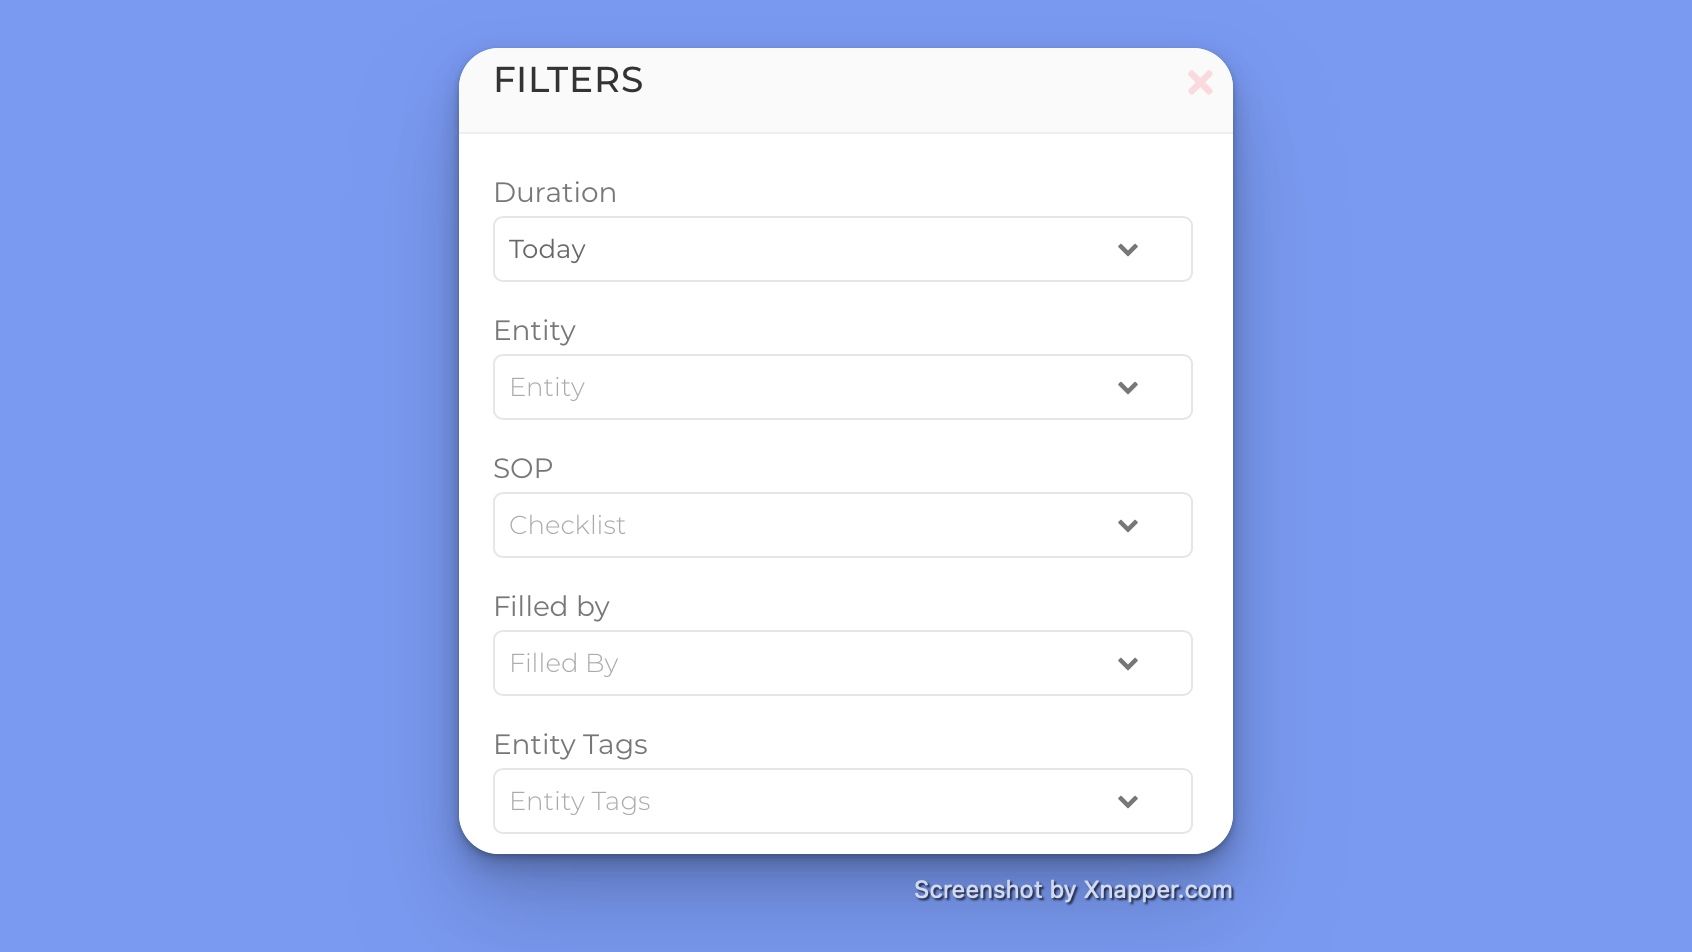
You can filter which SOPs the dashboard shows by five different dimensions. This makes it easy to instantly access a dashboard for SOPs completed over the last 7 days for a specific outlet.
Managing operations with a collection of Google sheets and multiple WhatsApp groups makes sense to a point, but eventually, you will need dedicated software to streamline your operations and manage the constantly changing requirements across all your restaurants.
If you’re responsible for a growing business that now has several outlets and you’re looking for a tool to manage your operations across multiple outlets, PeakScale is a powerful tool to set up, share, and maintain SOPs across all of your franchise venues. PeakScale also offers modules to help manage franchise licenses, it has a helpdesk module for internal questions, task management capabilities, and a team training module.
If you don’t already have a PeakScale account, you can sign up for a free two-week trial by scheduling a no-obligation online demo with one of our representatives here. We will help you set everything up with your business's actual SOPs during the call, as well as answer any questions you have about the tool and what it can do for your business.
Related Articles
- The Real Cost of Owning and Running a Restaurant.
- Increase Restaurant Sales | Recreate Restaurant Experience At Home.
- Increase Restaurant Sales During COVID-19 Through Transparency In Kitchen Processes.
- COVID-19 Food Safety Checklist For Takeout And Delivery.
- The SOPs and COVID-19 Playbook for Black Sheep Restaurants.